
Verifying IoCs with Snort and TraceWrangler
After detecting a network breach it is a good idea to scan the network for further Indicators of Compromise (IoC) to check for further malicious activity. The IoCs are usually derived from forensic investigations into network packets and compromised hosts, and can be quite unique when it comes to more sophisticated attacks (let’s avoid mentioning the APT buzzword here… oh, wait… darn!).
The major problem with network based IoC scans are that the rate of false positives heavily depends on how specific/unique the attack patterns are. Which is something they have in common with most IDS signatures. Best case would be a pattern that is never present in harmless network traffic. Unfortunately, those patterns are pretty rare, so in most situations an ongoing scan turns up hits all the time because of the patterns matching something that may be good or may be evil. An example would be a copyright string found in a C library that is used in a malicious binary, but could also be part of a software that the company uses everyday.
Step 1: Scanning for IoCs
Assuming you already have indicators of compromise collected from an investigation into a compromised system or network, the next task is to examine other network captures for occurrences for those patterns. This can either be done on a network security monitoring (NSM) device constantly scanning network packets, or simply a stack of pcap/pcapng files that you captured previously. Now, looking for IoCs in a ton of capture files with Wireshark is certainly possible, but not a good idea. Filtering in Wireshark is incredibly powerful, but you just do not want to scan a lot of files for patterns that way. Even when you script tshark into doing the filtering automatically, it’ll be too slow.
Instead, I usually run Snort on pre-recorded pcap files, letting it scan for IoC patterns by creating a specific Snort rule file that is used instead of the “normal” ones. To be able to scan a large amount of files I first create a list of all pcaps, doing a simple “dir” command with the “/b” parameter to only print the file names without the path (all of this is on Windows; on Linux you’ll probably use the “ls” command instead):
dir /b *.pcap > pcaplist.txt
This results in a file called “pcaplist.txt” containing a list of original pcaps similar to e.g.
SnortCapture01.pcap
SnortCapture02.pcap
SnortCapture03.pcap
SnortCapture04.pcap
SnortCapture05.pcap
Afterwards, I run Snort using the new list, having it check all files for my IoCs by using a specific Snort configuration file called “snort_ioclist.conf” which loads all the signatures I want to check. A typical command line could look like this:
c:\Snort\bin\snort.exe --pcap-file pcaplist.txt -pcap-show -c c:\Snort\etc\snort_ioclist.conf -l .
The “-l .” parameter asks Snort to output its findings into the same directory as the pcap files, but you can specify anything you like. You can omit the “-pcap-show” parameter, but I like it to see which file Snort is currently working on. I usually put the command line in a batch file to be able to run it again without having type it all in again. Running the batch file may look something like this:
Commencing packet processing (pid=1504)
Acquiring network traffic from "SnortCapture02.pcap".
Acquiring network traffic from "SnortCapture03.pcap".
Acquiring network traffic from "SnortCapture04.pcap".
Acquiring network traffic from "SnortCapture05.pcap".
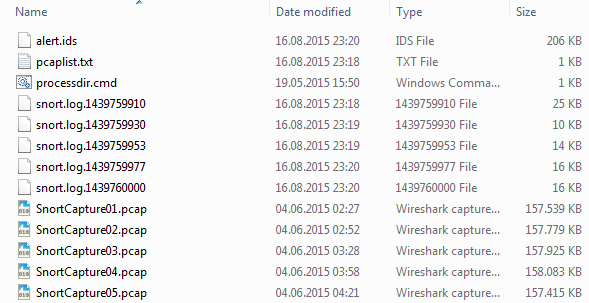
In the end, you’ll end up with a set of new pcap files, one for each original file, containing the packets that were a match to any of the snort signatures representing the IoC patterns. You’ll also get a log file called “alert.ids” that contains all signature matches in text format. So in the end, the directory ends up similar to this:
And here’s an example for a signature match in the alert.ids file (for this article I’m just using standard Emerging Threats rules for demonstration purposes):
[**] [1:2019876:2] ET SCAN SSH BruteForce Tool with fake PUTTY version [**]
[Classification: Detection of a Network Scan] [Priority: 3]
06/04-02:00:19.332296 43.229.52.185:40723 -> 81.209.179.151:22
TCP TTL:55 TOS:0x0 ID:59480 IpLen:20 DgmLen:67 DF
***AP*** Seq: 0x5BA4672  Ack: 0x37F8BD3D  Win: 0xE5  TcpLen: 32
TCP Options (3) => NOP NOP TS: 7253587 2695982163
Step 2: The verification problem
The problem with verifying Snort hits (or any NSM/IDS/IPS signature match) is always that those tools will give you a single packet almost without exception: just the one packet in which the offending signature had been detected. Anyone working with those results will know how hard it is to do a good risk assessment (meaning: do we care? or do we ignore this one?) with them. And if you don’t, here’s an example:
Imagine you get a signature match telling you “Possible Call with No Offset TCP Shellcode” – this is something that tells you something bad may be going on, e.g. someone trying to run an exploit and most likely establishing a remote shell. Now, the packet you look at is on an HTTP port and contains nothing but a lot of seemingly random payload bytes, including the sequence “E8 00 00 00 00 58“. Now, is this a really problem? Or is it just a false positive?
Basically, quite often you can’t tell right away – first, you need more information. Some can be seen in the single packet you have, e.g. the source and destination IP. With that you can answer questions like
- where is the target system? Is it a client? Is it a server? If it’s a server, where is it? In the DMZ? In the internal net?
- where does the packet come from? The internet? From another internal system?
- Do you have additional hits on the same source/destination IP address pair?
In the end, you’ll often asking question that the single packet cannot answer, e.g.:
- This is HTTP, so what was the host name this is coming from? Is it from “www.evilhackers.com”, or just from a site with a much better reputation?
- What was the full HTTP request? This could tell you a lot about the content and how the chances are that this is just a false positive
- What was the user agent?
There are tons of other interesting things, but they all have one thing in common: you cannot answer them from your single packet with the signature match. What you need is the full TCP conversation from start to finish (or UDP/ICMP request/response pair). With that you’ll often have enough data to make a decision.
BTW, the example above often happened to me frequently when someone was listing to a web radio station. So when I see the HTTP request leading to the signature match being “http://www.wdr.de/wdrlive/wdrplayer/wdr2player.html” (with “WDR” being a German radio station) and then hours of audio streaming, I can mark a “shell code” hit as false positive. Oh, and can you imagine going through dozens of large pcaps, backwards from the one with the signature match to find the GET requests about 5 hours earlier? It’s so annoying! Well, to be honest, in Germany (and probably other countries) you’re should consider yourself lucky when you have full packet captures at all – often enough those are not available since the company couldn’t get into an agreement with the workers council for this kind of thing.
Don’t get me wrong here: I’m not in favor of unrestricted/unsupervised network surveillance. Full packet captures are really important to be able to protect the network by doing a full packet inspection. But at the same time it must be made sure that those packets are only examined as part of an authorized investigation.
The hard way
IoC verification the hard way usually involves Wireshark or tshark (or any other packet decoding tool), opening capture files and extracting the conversations for each signature match. I’ve spent days and weeks doing that, and it’s not much fun. Basically you need to build a conversation filter based on the 5-tuple of each match, and filter for the rest of the packets with Wireshark or tshark. And even if you script this with a tshark script, it’s still a lot of work:
- build a conversation filter for each packet in the log entries in the alert.ids log file or all the snort.log pcap files
- filter through all original pcaps, one complete tshark run per filter, meaning for 100 filters all files need to be processed 100 times (at least if you want to end up with one conversation per file per signature match)
- merge partial results in case a conversation spreads across multiple original pcaps
- look up the snort rule hit for each extracted conversation to see what it was all about
- find the packet where the match was (sometimes this is optional, but may still be a good idea)
- evaluate the conversation for being a true positive or a false positive (which may take some time if you have to ask other people about the systems involved)
As you can see, this isn’t fun. And it gets a lot slower if you do it manually – I had a case where I had to verify hundreds of signature matches. It took forever (which is a big problem in an Incident Response situation when time is critical).
The TraceWrangler way
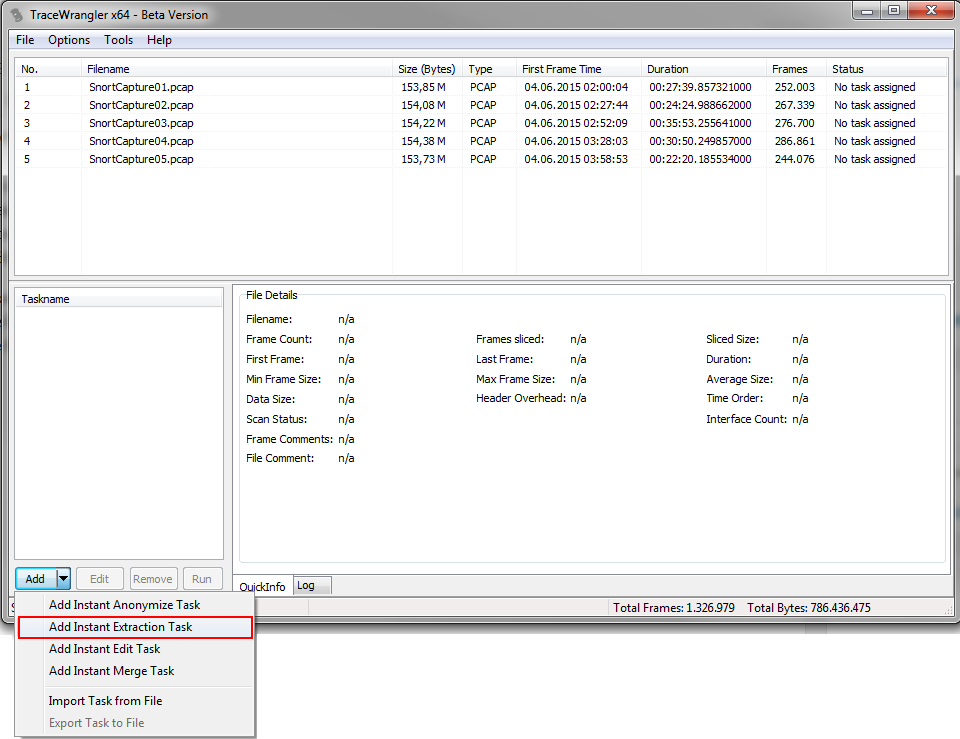
TraceWrangler can run “Extraction” tasks, basically allowing you to specify a list of conversation filters and an output name schema. Let’s assume you have 10 conversations that are spread across 5 capture files. TraceWrangler will read all of those files, look for the 10 conversations at the same time, and write all packets belonging to the same conversation into a separate file. You’ll end up with 10 files, each containing one of the conversations you want, with a file name you want.
So lets add our set of pcap files to TraceWrangler and add an extraction task. This kind of task is only available when all files in the file list have been scanned first, so if your files are really large and exceed the autoscan threshold you need to force the scan manually in the file details pane.
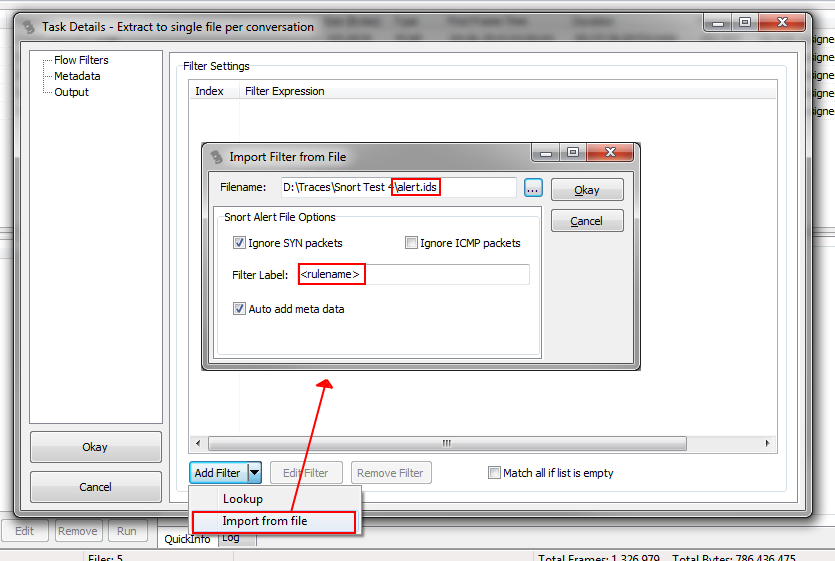
Next, the extraction task dialog opens where you can add filters for conversations you want extracted as well as setting the output file name schema. While it is possible to add filters manually, it doesn’t make much sense when you already either have
- a file in pcap or other capture format containing packets from conversations you want to extract
- a Snort alert.ids file
So instead of adding filters by hand, we chose to import them from a file, which will open a new dialog where we can specify the file as well as some import parameters. Here, we’ll import the alert.ids file generated by Snort, which will allow us to automatically add meta data records as well.
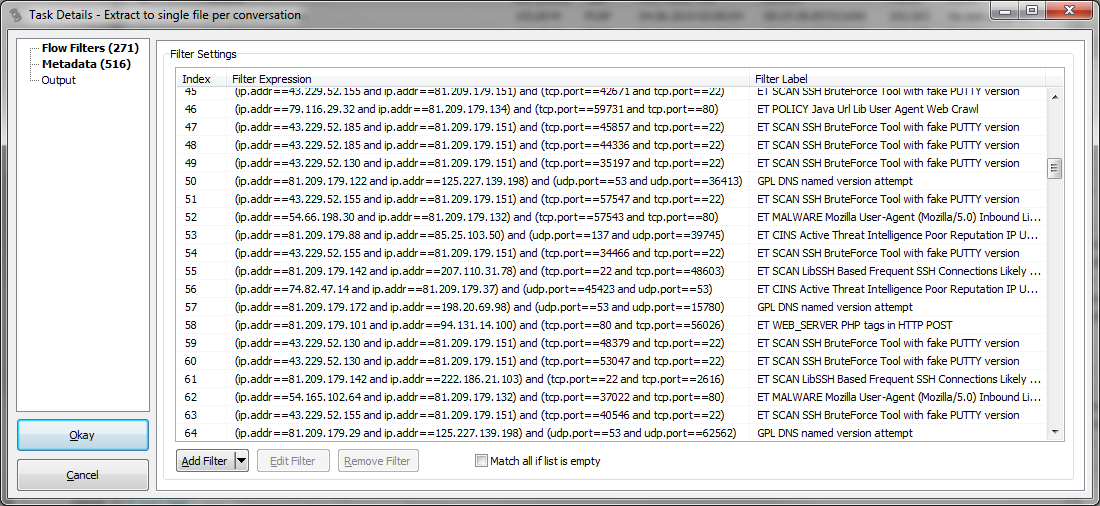
After accepting the settings, we see that we now have a list of filters, where the Filter Label contains the name of the Snort rule name, as specified in the import dialog above. This tells us why each the conversation filters was added:
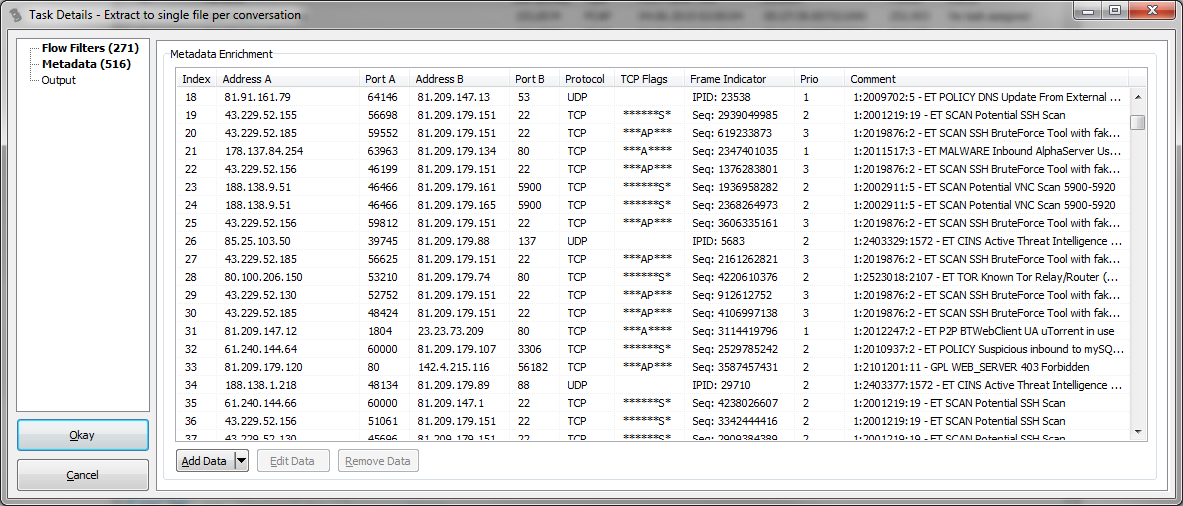
On the second page, the list of meta information now also has information about what Snort signature was found in which packet (if available, e.g. for TCP we’ll see the sequence number of the packet the match was found):
The final page allows us to define the output location and file name pattern of the extracted conversations. In this case I added the <filterlabel> placeholder to the file name pattern:
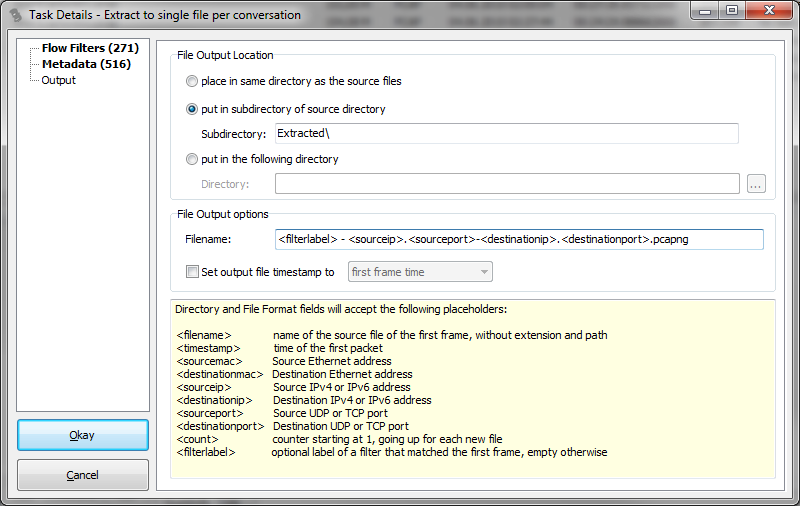
All conversations will be stored in a sub directory of the path where the original pcaps, and each file will start with the label of the filter followed by the socket pair that the filter was specifying.
After confirming the settings with the “Okay” button, the new task is ready to run:
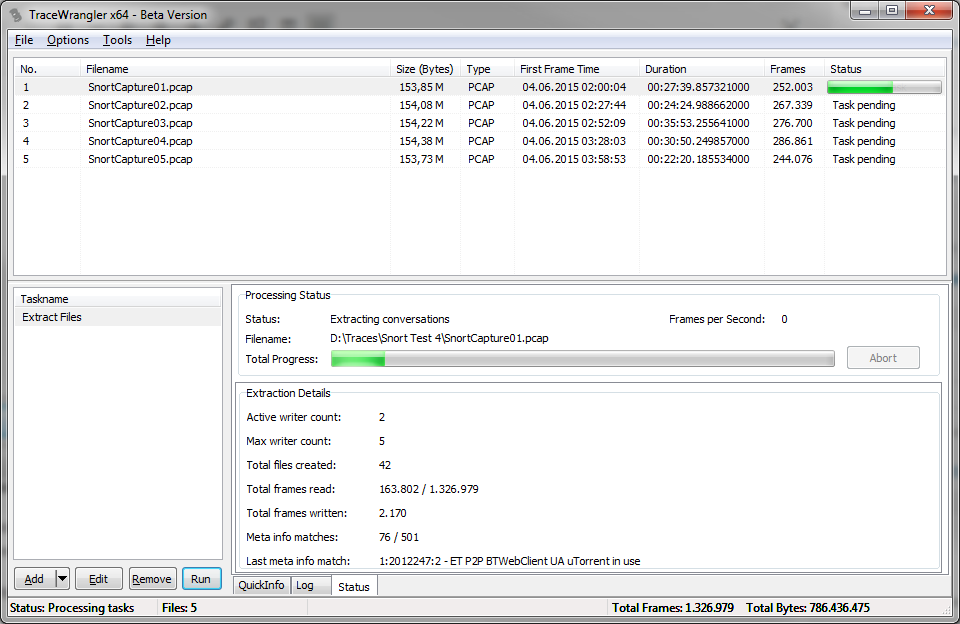
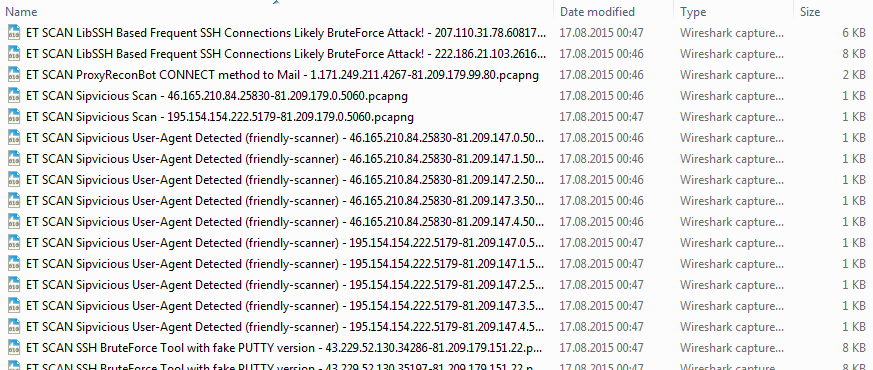
When all files are processed, we end up with a new sub directory containing our extracted conversations (or, as someone put it after seeing me demo this at my talk at the FIRST conference in Berlin: “oh, you’re using the file system as conversation library”). Yup, sorta 🙂
Step 3: verifying the conversations with Wireshark
The last thing to do is run Wireshark and drag and drop the conversation files onto its window one after another (with drag and drop being the fastest way of opening capture files in rapid sequence):

For those signatures where TraceWrangler had meta data with TCP sequence numbers (or the IP ID for UDP & ICMP) available it marked the packet with a comment which had the Snort signature match, as you can see in packet 4. This makes it a lot easier to see where the IoC pattern was actually detected.
Happy IoC hunting 😉
Nice article Jasper.
Seems you’re rapidly adding useful features to TraceWrangler!
As a security analyst I would love to have some CLI / API support in your tool in order to automate some stuff. But hey, one cannot have it all…
Nice to see your tweet about my Master Thesis b.t.w. 🙂
Cheers,
Niels
Thanks, Niels! I know, the CLI/API support is something I get a lot of questions/requests for – so far there wasn’t enough time for that. But I keep working on it, so you never know 😉