
The Network Capture Playbook Part 6 – Planning Network Troubleshooting
In the previous posts of the Capture Playbook series we discussed various approaches about how to record packets, but before going into more elaborate techniques of doing that we should talk about how a network troubleshooting project works, and especially how to plan a capture setup. In my experience this aspect of a troubleshooting is often neglected, which can be lead to problems during analysis. In the worst case scenario, a botched capture setup can make it impossible to find root cause in the packets that were collected.
Introduction
The main focus of this blog post is to look at reactive network captures. The difference between reactive and proactive captures is that reactive captures are set up after a problem occurred and removed again after it was fixed, while proactive captures are long term deployments that do not change. Planning a proactive capture setup is less stressful because there is no immediate need for troubleshooting, and the capture locations are often not that hard to determine. Typical proactive capture locations include the Internet uplinks, the plain text side of VPN concentrators, and main choke points in the data center. In reactive capture situations, the problem always dictates the capture locations.
Reactive troubleshooting phases
Troubleshooting a network can be divided into at least 4 phases:
- Planning the capture setup
- Capturing packets
- Analyzing packets
- Reporting
There may be more phases in situations where the problem is very complex, e.g. intermittent failures of multi-tiered applications. In those cases it may be necessary to capture multiple times, e.g. when the analyst realizes that capture points need to be moved across the network to pinpoint the exact location of packet loss. The planning phase for subsequent captures is usually pretty short, because it is much more obvious what needs to be captured.

Challenges
“Planning” a network capture setup may sound like an exaggeration to some of my readers. In many cases the plan for a network capture is simply “OK, run Wireshark, then press the capture button”. I’m well aware that probably more than 95% of all network captures are done that way, on a laptop, workstation or server. It’s simple, it’s fast.
The problem is – sometimes that approach gives you a capture quality that is not nearly good enough to analyze the problem. It’s probably fine when a developer wants to see what parameters his API calls are transmitting, or to check if a ping packet (=ICMP Echo Request) is sent using the correct network interface. But if the problem scenario gets complex, the capture setup will not be simple, either.
Complex scenario examples
Let’s take a quick look at some real world problem example scenarios where the capture setup isn’t just as trivial as running Wireshark on a laptop and capturing with it’s internal copper network card:
1. Application Server connectivity loss
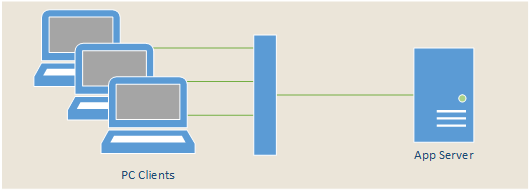
Dozens of client PCs at a customer site lose connectivity to an application server every once in a while for unknown reasons. It is not possible to predict the client and the time of the problem occurring, and the server is connected with a 10Gbit/s link.
2. The Network latency predicament
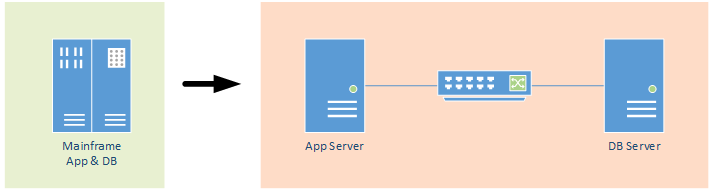
A company wants to move custom applications from an old mainframe to Linux based application and database servers. Separating the application logic from the database servers results in horrible performance, so it needs to be determined if the network latency introduced by the new physical deployment is causing the problem. The network speeds are 1Gbit/s everywhere.
3. Server Stress Test
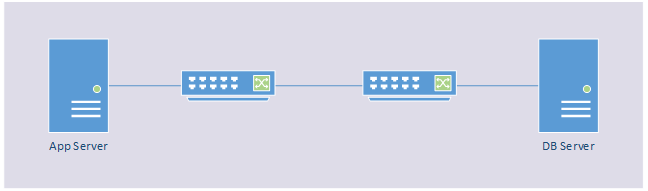
An application server connecting to a database server needs to be able to allow a certain number of concurrent sessions per second. A stress test reveals that some connections do not work, but it is unclear if it’s caused by the application server, the database server or the 1Gbit/s network.
All of these scenarios require a plan to get a good capture result. So let’s see what we can do.
Limiting factors
In an ideal world you would be able to design any capture setup you like. Unfortunately, there are a number of limiting factors that make it hard to get the results you need:
- TAP or SPAN – some situations may be analyzed using a convenient SPAN port, others require TAPs (which you may no have). Keep in mind that SPAN is always a compromise, and never as exact as a TAP setup. If the situation requires high capture quality, SPAN is not an option. See the previous parts of the playbook for more details about TAP vs. SPAN.
- Number of capture locations – some problems require simultaneous captures at multiple capture locations to pinpoint where things go wrong, e.g. delays, packet loss and packet manipulations
- Physical access – some devices involved in the problem scenario may be “off limits” for physical capture setups, e.g. when the server is sitting in a public cloud somewhere. Neither Amazon nor Microsoft will open their data center doors for you to walk in with a capture appliance in your hands.
- Time and disk space – if a problem is only occurs at random times, disk space can become a problem because the captured packets will eat it up at some point if you’re not prepared.
- Physical link characteristics – if all you got is a Laptop, you’re limited to single port copper based captures. So any scenario that requires fiber network cards, full duplex setups or link utilization more than a few hundred MBit/s, you’re out of luck, unless you use special additional capture equipment like a ProfiShark TAP.
- Capture devices – if you only have a single old laptop you are definitely in trouble. If you’re lucky you may have access to multiple professional capture devices, e.g. from vendors like NetScout, Riverbed or Savvius, to name a few (listed in alphabetical order, so please, sales people, don’t get mad at me – you chose the company name, I just sorted them).
Planning Steps
Alright, so let me walk you through the steps I do when I plan a capture for a customer in a troubleshooting situation. First of all, it’s important to keep in mind that this process requires heavy interaction with the customer, and sometimes you’re not talking to the right person in the beginning. If that happens, ask them to get you in contact with whoever knows the details you need, even if it is a third party – which happens every once in a while. You’d be surprised how often the person with the most knowledge about the company network turned out to be an external contractor.
The general planning steps are:
- Define the exact problem situation
- Determine optimum capture locations and collect link characteristics
- Adjust capture location selection based on available resources
As you can probably already see, step 3 can take some effort until everything works out. The longest time I spent on planning a capture was for a large bank which took more than a week, basically adjusting the plan until it seemed perfect.
1. Define the problem situation
This step is critical, and it involves pen and paper (or any electronic equivalent) to take as many notes as possible. Before you can design any capture setup you need to do three things:
- Listen to the customer explain what the exact problem is
- Asking questions when something isn’t very clear. Rinse repeat.
- Writing it all down in greatest detail possible
I cannot stress enough how important this part is. If you don’t really understand what the problem is there will be trouble later, because it’s hard to analyze data if you’re not 100% sure what you’re looking for. You need to be confident that your capture setup design is capable of recording the problem packets in adequate quality, and there are so many things that can go wrong. I know it looks silly sometimes to ask the customer a ton of questions (especially to clarify if you got something right), but let me tell you this: it beats having to explain why time and money was wasted on an analysis that got stuck because of a hasty capture design any day of the week.
In the end, you need to know exactly:
- How the problem manifests itself
- Connection problems (can’t establish, premature abort, fatal crash)
- Critical/unexpected delays, slow response times (write down if you’re talking about seconds, milliseconds, microseconds)
- Application problems
- What are the determining factors that the problem has occurred? Meaning, how can you tell that the problem just showed? This sounds strange, but if you’re waiting for the problem to happen later during capture you should know how you can tell.
- The time frame of the problem
- is it reproducible? If so, what triggers it? What is the time frame you have to wait?
- is it sporadic? If so, how often does it happen/what is the probability to catch it in a given time span of e.g. a day?
- Affected devices and users
- what computer/phones/switches/other devices are affected? Which ones are not affected?
- which users are affected and which users are not affected, if any (great for taking comparative captures to see where they differ)
- if all users/devices are affected at random, where do you have the best chance to capture the problem? Maybe there is a group that is more likely than others.
Pro Tip: if possible, let the customer demonstrate the problem to you. It’s not uncommon to see that your and their understanding of a problem is quite different. Sometimes there even is no real problem at all.
My favorite example of a “we have no real problem” situation happening is when we were hunting various problems at a company for a week, and an employee complained that “printing a document was too slow”. So I asked him to demonstrate, and he opened a document in Word to send it to the printer. The printer pushed out the first printed page after maybe a second later, with the employee pointing at it, saying “see? that’s not good”. When I asked why he thought that it was too slow, he said “because when my colleague prints her stuff, it’s starting printing it in half the time.” Step 1: Facepalm (a mental one. Customer may get mad if you really perform one). Step 2: Skip capture discussion. Step 3: move on.
2. Determine optimum capture locations
Determining the optimum is usually not that complex. The trick here is to avoid being unrealistic, even though we’re trying to find the best solution possible. If you know you’ll never be able to get a 100GBit/s capture solution you shouldn’t even consider a capture point at a 100GBit/s link. The goal is to define a setup that is possible to achieve, even though you may not have all the necessary resources yet.
There is one rule that I follow almost under any circumstance: never capture on a device that is part of the environment that needs to be analyzed. And yes, that also involves Firewalls, WAN accelerators, loadbalancers, and anything else deployed in the production network. Any device that is in the path of the packet cannot be trusted to record correct results. They will always be biased and not show the same picture as what really went out onto the wire. Yup. Always assume they’re lying to you at all times.
Pro Tip: capturing fast links (e.g. 10G and up) is tough, but even if you have the right capture equipment, maybe you shouldn’t just “get it all” – because someone (you?) has to look at the gazillion packets later to find the handful you really need. Try to find a setup that is balanced between what you need and what you can analyze.
There are usually three sources you may have access to to gather and deploy capture equipment:
- your own equipment (obviously)
- the customer’s equipment
- rentals
Sometimes, customers do have capture equipment, but it may be deployed in a location where it doesn’t help. In that case you need to find out if and how fast it can be moved to where you need it. Rentals are another possibility – I have sometimes rented TAPs and capture systems from various sources. In my experience some capture hardware distributors are ready to rent you what you need for a certain price (usually some single digit percentage of the list price, per day). If you rent something, make sure you test and familiarize yourself with the rented equipment before deploying it.
Another detail to consider is how many capture locations do you need. Some problems require capturing “at both ends” of the conversation, e.g. at a client and on the server at the same time. Notice I said “at”, not “on”. See the “one rule” above.
Two (or more) locations are usually required when the problem involves
- determining if there is packet loss, and locating the device causing it
- checking for in-transit modifications of packets (e.g. missing TCP options that were present on the other side)
- calculating timings on certain network segments
In most cases, deploying two or more capture systems also means that you need to use network TAPs for accuracy.
In the end you should end up with a network diagram that contains all capture points you’re going to use, and designate them with unique IDs. These IDs must also be used when naming capture files later, because nothing is more confusing than not knowing where a file was captured.
3. Adjust capture location based on available resources
In this step the goal is to find a solution for a capture setup that is realistic based on what you can scrape together from various sources. One thing important to note is that you shouldn’t just think of this as “okay, one TAP here, a SPAN there, notebook capture at that location, capturing with the capture appliance in the data center, done.” – because you also need to plan who is going to operate the capture devices where at which time. If you’re hunting for a sporadic problem you usually start the capture and wait for the problem to show, which is easy. But some situations require running through a more or less complex set of problem scenarios, and that usually means you have two options:
- Start all capture devices before you run the scenarios and stop them after everything is finished
- Start and stop the capture before and after each scenario
The first option means you’ll potentially end up with a huge pile of packets in which you’ll have to find the relevant communication flows. This can take a long time depending on what your analysis capabilities are, and how much time you have to do the analysis. From my experience, the main aspects to keep in mind are:
- Define a point of contact for users to notify about the problem having just been encountered
- Make sure people are instructed to notify that point of contact with an exact date/time and IP address. Sometimes you can set up clever notification mechanisms like the Sonar tool the TribeLab guys use
- Make sure your capture systems are time synced as precisely as possible so that you can find the date/time of the user report easily, even at multiple capture locations
The second option gives you a much smaller sample set to work through, but may give you a different set things to consider:
- You need someone to operate the capture devices in each location
- Starting and stopping the capture needs to be synchronized, usually via phone calls (and now think about someone sitting in a cold, very noisy data center, trying to listen to a phone call. Yup. Been there, done that.)
- You should define a capture file naming scheme beforehand so that you can identify the captures later
- The most critical thing is to make sure no scenario is started before the capture device operators all signal they’re “good to go, capturing is running”.
In the end, the goal is to find a balance between what you think would be the best capture setup and what you can deploy (and analyze).
Capturing sporadic problems
Capturing sporadic problems is much more complex than capturing those you can reproduce. Determining capture locations can be a difficult when the problem moves between a large number of systems. You’ll often have to select as many as you can cover with your equipment and hope for the best. The main challenge is that you need to be able to capture until the problem shows up, and that comes down to the available disk space.
It may be advisable to configure a ring buffer capture, overwriting older PCAP files after a certain number of files. I usually calculate like this: available disk space divided by PCAP size (usually 64/128/256 MB chunks), then select a number lower than the result to have some spare room left.
E.g: let’s assume I have 1 TByte of free disk space, and I want to work with 128MB PCAP files. 1 TB = 1,024 * 1,024 MB = 1,048,576 MB in total. Divided by 128 I get 8,192 files. So I would go for a ring buffer capture of e.g. 8,000 files. One problem is now that as soon as 8000 files have been written, the first file will be replaced with file number 8001. Then the second with file 8002. And so on. You need to make sure that the number of files is big enough to avoid overwriting the problem before you can stop the capture. So when you start the capture, I always check how fast the files fill up, and calculate how long the remaining number of files will last.
The remaining time should be a lot less than it takes to:
- realize that the problem occurred (usually by an employee of the customer)
- notify you that the problem should be in the capture
- go to the capture device (or remote into it, if possible at all) and stop the capture
Here we go again: additional captures
In some situations, further captures are required after the first analysis has been performed. This is often the case if you’re trying to track down a faulty device, e.g. when packets get lost or modified on their way. Sporadic problems also often require additional captures when they keep showing up where no capture device is placed. Basically, there is only one important aspect to performing additional captures: determining the probability of having to do that, and communicating it very openly to the customer. If you think it may be required to capture more than once, make it clear right from the start. This will save you some harsh discussions later when you surprise them with the fact that you need to start over again.
Need some help?
Congratulations, you made it this far. As a reward – and to help you with any kind of capture situation planning – I have prepared two documents you may find useful. The first is a questionnaire that can help planning a capture together with your customer. It has room for up to three different sites involved in a single analysis setup, which should be enough in most situations:
Packet Capture Questionnaire (Letter format)
Packet Capture Questionnaire (A4 format)
The second is a checklist you can use to make sure you’re prepared to go and capture the packets:
Network Capture Equipment Checklist (Letter format)
Network Capture Equipment Checklist (A4 format)
Final Words
Alright, you made through a topic that is a bit dry and may not be relevant to many people. But maybe there was a thing or two you can use in the future. In the end, it comes down to three key strategies you should go for:
- Take the lead – customers/coworkers expect you to tell them how to do things when it comes to network captures. Most have never even configured a span port, much less performed a complex capture setup
- Test your equipment – of course equipment can always fail when you show up at the customer site. But there is a big difference if you had tested everything before and it worked, compared to just show up with no clue at all. It gives a certain level of confidence to know that you did everything to make sure the capture would work.
- Make sure everybody is informed – communication about the status of the analysis helps to make sure everybody knows what’s going on. This is especially important if problem reporting by users is required, because they need to know how to do that in a way that helps you perform your analysis.
- Document. Document. Document. Write down all the details you can.
Other parts of this series
Part 1: Ethernet Basics
Part 2: Speed, Duplex and Drops
Part 3: Network Cards
Part 4: SPAN Port In-Depth
Part 5: TAP Basics
Hi Jasper,
The series of network capture playbook is really comprehensive and great piece of work.
Appreciated if you could help me understand the below scenaio/requirement.
I have been tasked with setting up a long term proactive capture for DNS traffice analysis. I begin with SecurityOnion being my IDS device, bundled/bonded 2x 1Git/s interfaces . I configured RSPAN port egress interface of Core Switch (Cisco 68xx) to the firewall but I am not able to see the DNS traffic as we do see when capturing traffic using wireshark at our home wifi.
Curent setup is below:
1- Core > Access > Firewall
2- Chaned the RSPAN source from Core to Access Switch Egress interface connected to Firewall.
3- Configured monitor source VLAN, not the port.
4- Only internal DNS can query the external/public DNS.
5- Clients who bypass proxy would be denied access at firewall.
Objective is to sniff all the traffic and analyse every single DNS query and responses.
Your invaluable suggestion/feedback would be highly appreciated.
Thanks,
Hi Tanweer, thanks for the kind words.
Regarding RSPAN I have to say I rarely use it, and the last time I did was years ago. But steps involved on Cisco equipment should be:
This should basically be it. If you don’t see traffic it’s usually because the transport VLAN setup is incorrect, but as I said, I haven’t done this kind of setup that often. Good luck!
Thank you for your response/suggestions Jasper.
Let me go through the necessary changes and I would share my experience to you.
Have a nice day.