Working with multi-point captures
Every now and then most analysts run into a troubleshooting situations where they need to capture the same packets at different locations in the network. Some reasons for such multi-point captures include
- having to determine if packets get delayed at some point in the network (this would be one of the few cases where “it IS the network”)
- checking if there is packet loss, checksum errors (which is basically leading to packet loss, too) or any unwanted packet modification “on the way”
- determining if all conversations look the same on both (or more) capture locations
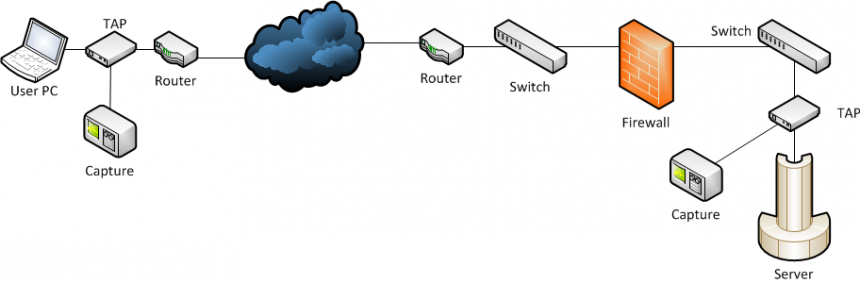
One of the problems is to select the correct capture locations, but let’s assume we got that covered for the sake of the length of this post. And sometimes it’s really easy, e.g. when you capture at a client and at a server (and have enough TAPs and capture devices, of course).

Quick reminder: situations like the three mentioned above will most likely require the use of network TAPs to exclude packet loss/timing issues caused by SPAN ports. Using SPAN is really only good for application behavior tracking, and when you really do not care about network/packet transmission characteristics. BTW, yes, that couch is a server. Old school ftw! 😉
Comparing captures
After recording the packets the task at hand is to compare the capture files. Depending on the problem situation this usually means either to find matching packets and conversations at each location, or determining where the differences are. It’s not possible to say which of both is easier to achieve since both can get pretty complex. Finding and matching UDP packets is often more difficult than doing the same for TCP packets, simply because there is no “conversation” going on. So if you look for a UDP packet you’ve found at one location it may be difficult to find the same packet at the other location – because if it’s not there its often hard to say why, or if it should have been there at all. With TCP, you get at least a couple of packets for each conversation, and that makes it more likely to find them.
Relative and absolute TCP conversation filters
There are basically two filters that you can use to isolate TCP conversations in Wireshark : one of them is a relative filter, the other is absolute.
The relative filter is “tcp.stream” which is used whenever a user selects the “follow TCP stream” popup menu option on the packet list (which, as far as I can tell, is the one thing each and every user does first when starting to work with Wireshark 🙂 ). “tcp.stream” filters on the stream index, which is assigned to each TCP conversation by Wireshark when loading the trace. The index of zero is assigned to the first conversation found in the file, the second has the index of 1, and so on. This makes it real easy to extract all TCP conversations if you want – just write a small script that runs tshark and filters on increasing stream indexes. By the way, in old versions of Wireshark (1.6 and earlier) the stream index was also counted up for UDP packets, so there were often gaps in the index count when using “tcp.stream“.
The absolute filter uses the TCP socket pair to filter for the conversation, meaning both IP addresses as well as both TCP ports. A typical example would be “ip.addr==192.168.0.1 and tcp.port==49152 and ip.addr==10.0.0.1 and tcp.port==80“. Since the client will use a different port for each new connection there will never be two identical socket pairs at the exact same time.
Extracting TCP conversations
When looking for the same conversation in different capture files, the only useful filter for matching TCP conversations is the absolute filter, using the socket pairs. This is true for multi-point captures, but also for multi-file captures at the same location, e.g. when doing a long time capture with a fixed file size and multiple capture files. Imagine a capture where a specific TCP conversation starts in the first file and ends in the third file. You’d have something like this, with the packets of the conversation stretched over all three files:
 You obviously cannot use the “tcp.stream” filter, because the same TCP conversation will have a different stream index in each file – depending on what else is stored in the file. Instead you have to use the absolute filter, because it will work no matter where the packets are stored within each file.
Finding and matching packets
When you have managed to extract the same conversation on both (or more) location, the best case scenario is that all conversations start and end with the same SYN and FIN or RST packets, meaning that they’re available end to end. In this case the rest is more or less routine: go through the packets in both captures and compare timings, content, packet loss etc., depending on what you wanted to do. Keep in mind that it is often not necessary to have the exact same time on all the capture devices, because most timing problems can be solved by comparing relative timings.
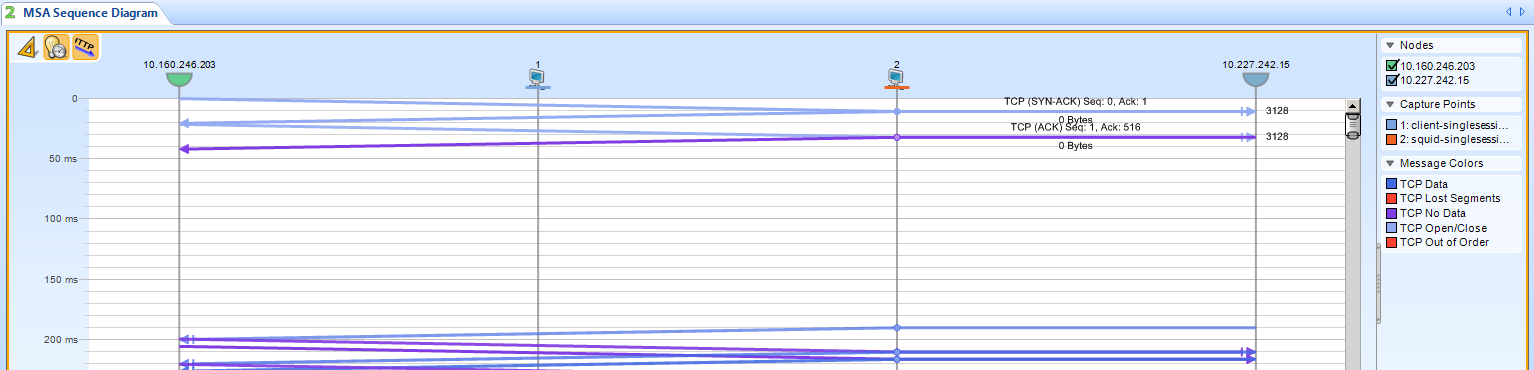
This is how two captures taken at different locations (client and proxy server) could look like – you can tell by the timings that they’re different (and if you could see the Ethernet addresses, you’d notice they’re different, too):

packets at client location

packets at proxy server location
But sometimes you end up with two (or more) captures that aren’t complete on all locations, which is often caused by starting one of the captures too late. Unfortunately, it’s not always easy to do another take of the captures, e.g. when you can only look at the files later, or when someone else captured them for you. Sometimes, even a partial capture can be used to diagnose the problem, especially when it’s a long conversation where the problem is known to occur at least once during the duration of minimum packets available in all captures.
If you’re trying to match incomplete conversations the process works like this:
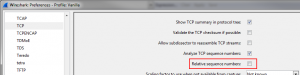
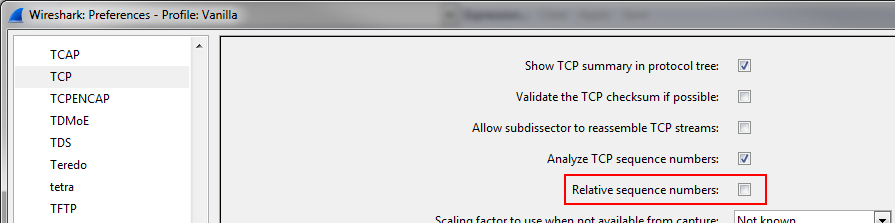
- Toggle Wireshark to use absolute TCP sequence numbers (in the TCP preferences) – relative numbers won’t work, because you have various starting sequence numbers, messing with the relative numbers
- Determine the lowest sequence number in each capture file for the conversation you want to analyze
- Compare the sequence numbers you determined
- Use the highest of all the sequence numbers to find the packet with that sequence number in each capture, by filtering for “tcp.seq==highseq” (replacing “highseq” with the sequence number).
- Do the analysis
Final words
Analyzing multi-point captures isn’t something you have to do often, but when you do, these are my recommendations:
- Filter by absolute conversation filter (socket pairs)
- Disable relative TCP sequence numbers, and verify that you really found the same packets
- If you don’t have them already, get at least two large TFT monitors to have two Wireshark instances running side by side
- Comparing UDP packets is much harder as there is no sequence to follow, so you need to find a criterion can you hope to match packets with
Also keep in mind that matching packets in multi-point captures gets much harder (and sometimes close to impossible) if there are NAT devices or load balancers involved, not to mention proxies/reverse proxies, encryption devices and other nasty surprises.
Oh, and in case you’re wondering: there are commercial analyzers that can help with correlating packets, e.g. Wildpackets Omnipeek or Riverbed’s “Pilot” (now “SteelCentral Packet Analyzer”), of which the output for the two captures show above looks something like this:
Thanks for sharing ! Always clear the way you write.
Thank you, you’re welcome!
great job Jasper
Your articles are always a delight to read
Thanks, Tony, I’ll try to keep it that way 😉
Regarding multi-point captures and UDP traffic:
I’ve made good experience to spot packet loss by using the IP ID.
One way to do it, is running tshark with a display filter for one direction and only output the IP ID for each capture file.
Afterwards diff the list of IP IDs to spot the packet loss…
Yes, that is a good way to track UDP packet loss. Unfortunately, it doesn’t always work, e.g. when a TCP stack like the one in OpenBSD sets the IP ID to zero except when fragments occur. Also, IP ID will not be available in IPv6 anymore, because it’s moved to the optional Fragmentation Extension Header. Fortunately for network analysts, both cases are pretty rare 🙂
Hello! In case of a multi point capture with many packets in one TCP stream, is there a convenient/graphical way to figure out at which point a packet was dropped in a network? Does Steelcentral Packetanalyzer show at which point a packet didnt make it through and caused a DupAck/Retransmission?
I don’t think there is an easy way, at least not without spending money. Some commercial tools can probably do this but I haven’t used them for this so far. I’ve seen a Network General appliance somewhere around 2006 that could graph up to 8 capture locations but it was so slow that you could only use it with files less than 10MB. And it was really expensive back then, too – more than 30.000 Euros as far as I remember.
Hello Jasper. Maybe you can answer this Multi-Capture-Question?
We have two capture points in the network. At Access-SW + WAN-Edge to figure out if there is packet loss inside LAN. At Access there was of course much less traffic captures compared to WAN edge where everything aggregates. Now, on WAN-Edge-Capture I want to filter out all traffic that did not come from access switch.
So, is there a way to create Display/BPF Filters that only contains IP conversations from Access-SW capture file to that I can apply this filter to WAN-Edge capture file?
I hope you understand my goal to only see conversations that show up in both files?
Thank you!
Hi Frank!
Sorry for the delay, I’m a bit slow these days…
What I would do is run tshark on the Access-SW capture to dump all Conversation tuples (IP:Port-IP:Port) to a file, so that you would end up with basically the same thing as what you can see in Wiresharks TCP/UDP Conversation Statistics window (you can copy the details from there as well, but it only works with single files, while tshark can do batch processing). Then you might need to de-duplicate the file to remove unnecessary entries. Use those entries to run a carve job on your edge capture file(s) by creating a BPF or display filter to run against them (I’d go with tshark again). There’s also an option to do this with TraceWrangler but I don’t have a good description right now – I think I’ll have to do some Youtube videos soon.
Cheers,
Jasper