
Installing Moloch on Debian 9 Stretch
Moloch is a tool that builds on Elasticsearch to process large numbers of network packets, either from a live network or from imported PCAP files. This is how I installed it on a Debian 9 server.
Installing Moloch turned out not to be exactly easy when I prepared my Sharkfest 2018 Talk “The Unusual Suspects – Open source tools for enhancing big data & network forensics analysis”. In fact, it gave me a pretty hard time, mostly because of that [insert random profanity here] Java environment and other dependencies that broke some of the installation scripts. It even got me as far as trying to deploy Moloch from an existing Docker image, which failed at some point, too.
So to make it easier for anyone who wants to install Moloch on Debian 9 like me, I documented my steps and put them in this blog post.
Preparing the base OS
For my Sharkfest demo I used a stripped down Debian 9 x64 NetInst installation in a VMware virtual machine, with the following specs:
CPU:     4 cores
Memory:  4GB
Disk:    200GB
Network: 2 network cards, one for management, one for capture
As far as I know Moloch requires two network cards or it won’t work, so make sure you have at least two of them in your system. In my VM the network cards turned out to be named “ens33” and “ens34”, and I used ens33 as management card. So I selected it as primary interface (in the text installer, you could use the graphical one if you want):
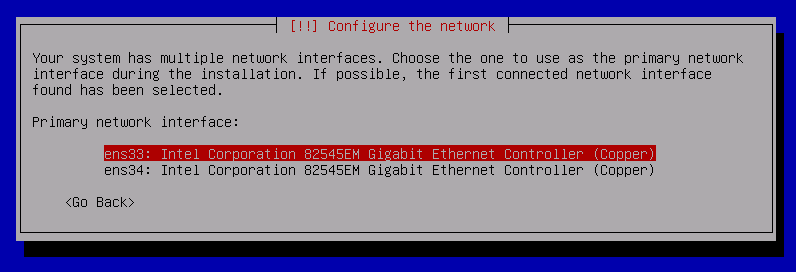
Figure 1 – selecting the primary interface
The rest of the installation should be pretty straight forward, so I don’t describe it here. If you don’t have experience with it and need more help, check out this tutorial. The only thing I did at the end is to deselect all software packages except the “SSH server”, to keep the system as minimal as possible:
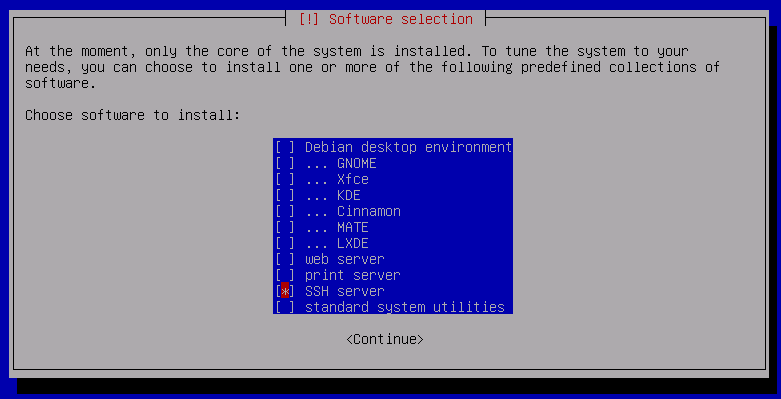
Figure 2 – Debian Software selection
After the system boots for the first time I logged in on the console to get/set the IP address of the management interface, and switched to SSH next, changing to the root account after login:
login as: jasper
jasper@192.168.88.130's password:
[MOTD...]
jasper@moloch:~$ su -
Password:
root@moloch:~#
In the next step I installed a few software packages that a minimal Debian system is missing (you should only add the “open-vm-tools” if you’re running a VMware VM, of course):
root@moloch:~# apt-get update && apt-get upgrade
[...]
root@moloch:~# apt-get install sudo less open-vm-tools curl software-properties-common vim unzip
[...]
Next, we need to configure the network interfaces. The first is probably already configured correctly, but we need to prepare the seconds card as capture card, turning off any IP address and the offloading features. So use your favorite editor and edit the /etc/networking/interfaces file:
root@moloch:~# cd /etc/networking
root@moloch:~# nano interfaces

# This file describes the network interfaces available on your system
# and how to activate them. For more information, see interfaces(5).

source /etc/network/interfaces.d/*

# The loopback network interface
auto lo
iface lo inet loopback

# The primary network interface
allow-hotplug ens33
iface ens33 inet static
    address 192.168.88.130/24
    gateway 192.168.88.1

allow-hotplug ens34
iface ens34 inet manual
    up ip link set $IFACE promisc on arp off up
    down ip link set $IFACE promisc off down
    post-up ethtool -G $IFACE rx 4096; for i in rx tx sg tso ufo gso gro lro; do eththool -K $IFACE $i off; done
    post-up echo1 > /proc/sys/net/ipv6/conf/$IFACE/disable_ipv6
Make sure that you get the interface names right, so be careful with copy & paste 😉
Installing the Java environment
Installing the Java environment required for running Elasticsearch turned out to be a nightmare. I don’t know why, but for two days I only found installation tutorials that didn’t work at all, going into crazy things like replacing Java version strings with sed, and other workarounds. I finally managed to get the environment installed, and here’s what I did:
Step 1: Download Oracle Java from their site
First, we need to get the Oracle java SDK, using curl and accepting the license automatically:
root@moloch:~# curl -L -b "oraclelicense=a" -O http://download.oracle.com/otn-pub/java/jdk/8u192-b12/750e1c8617c5452694857ad95c3ee230/jdk-8u192-linux-x64.tar.gz
  % Total    % Received % Xferd  Average Speed   Time    Time     Time  Current
                                 Dload  Upload   Total   Spent    Left  Speed
  0     0    0     0    0     0      0      0 --:--:-- --:--:-- --:--:--     0
100   531  100   531    0     0    772      0 --:--:-- --:--:-- --:--:--  2885
100  182M  100  182M    0     0  9488k      0  0:00:19  0:00:19 --:--:-- 7264k
root@moloch:~#
If this doesn’t work it is highly likely that the Java version (or simply the download link) changed once again. To get around that problem, open the Java download page and find the latest JDK file for Linux x64 with a .tar.gz extension, and copy the link:
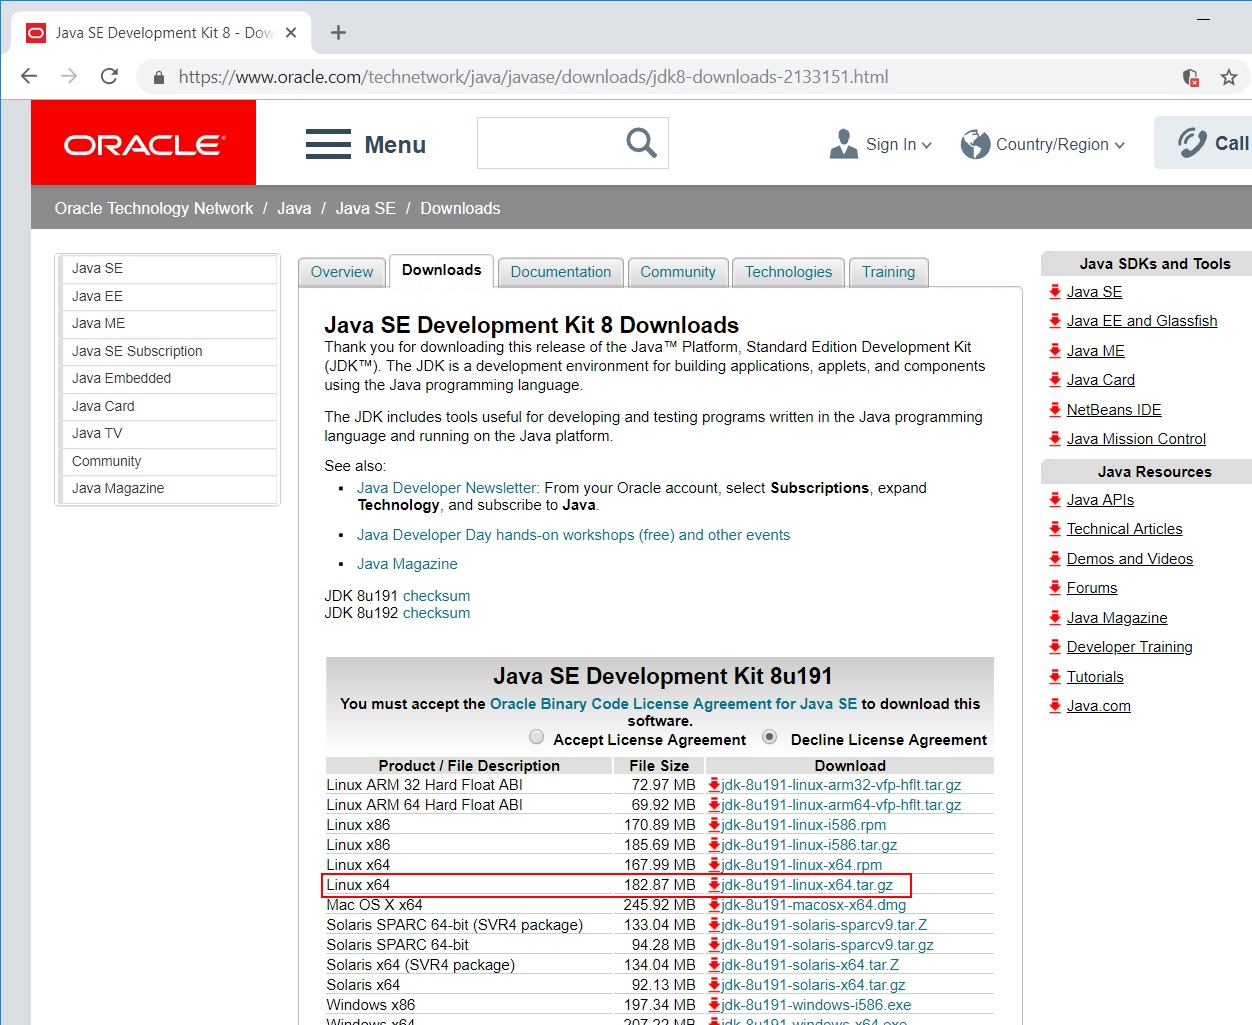
Figure 3 – Java 8 JDK download page
Note that in the link above I downloaded version 8u192, which is a little further down the page, but I didn’t want to screenshot that much of the page. Make sure to download the JDK itself and not the “Demos and Samples” stuff (which is why there seems to be always two download lists for each version).
Step 2: Unpack
Unpacking is done in the following steps, creating a target directory first and then unpacking the tar.gz file (make sure to adjust the tar.gz filename if it is different from mine):
root@moloch:~# mkdir /usr/local/oracle-java-8
root@moloch:~# tar -zxf jdk-8u192-linux-x64.tar.gz -C /usr/local/oracle-java-8
Step 3: Update Alternatives
Next, we make sure the Oracle Java version is used by default:
root@moloch:~# update-alternatives --install "/usr/bin/java" "java" "/usr/local/oracle-java-8/jdk1.8.0_192/bin/java" 1500
root@moloch:~# update-alternatives --install "/usr/bin/javac" "javac" "/usr/local/oracle-java-8/jdk1.8.0_192/bin/javac" 1500
root@moloch:~# update-alternatives --install "/usr/bin/javaws" "javaws" "/usr/local/oracle-java-8/jdk1.8.0_192/bin/javaws" 1500
Make sure that you have the correct version number in the commands before “/bin/java…”, otherwise they will result in an error message.
Step 4: check Java version
Finally, we check that the Java version is what we need:
root@moloch:~# java -version
java version "1.8.0_192"
Java(TM) SE Runtime Environment (build 1.8.0_192-b12)
Java HotSpot(TM) 64-Bit Server VM (build 25.192-b12, mixed mode)
Installing node.js and npm
Moloch will need node.js in version 8 (the newer versions will fail on building Moloch 1.6) together with npm, so we need to make sure we get the right version. For that, we run
root@moloch:~# curl -sL https://deb.nodesource.com/setup_8.x | bash -
## Installing the NodeSource Node.js 8.x LTS Carbon repo..
[...]
Followed by:
root@moloch:~# apt-get install -y nodejs
Reading package lists... Done
Building dependency tree
[...]
To make sure we got the correct versions, we check them both for node (needs to be 8.x) and for npm (needs to be there at all):
root@moloch:~# node -v
v8.12.0
root@moloch:~# npm -v
6.4.1
Installing Elasticsearch
I installed Elasticsearch from a .deb file, downloading the latest version from their web site via wget. I think Moloch also downloads a .deb file during install, but this way I had the latest version (6.4.2, as of writing this tutorial) which worked fine:
root@moloch:~# wget https://artifacts.elastic.co/downloads/elasticsearch/elasticsearch-6.4.2.deb
Installation is done with dpkg:
root@moloch:~# dpkg -i elasticsearch-6.4.2.deb
Selecting previously unselected package elasticsearch.
(Reading database ... 33489 files and directories currently installed.)
Preparing to unpack elasticsearch-6.4.2.deb ...
[...]
We start Elasticsearch to check the status, and stop it again so it doesn’t give us problems during the Moloch installation:
root@moloch:~# service elasticsearch start
root@moloch:~# service elasticsearch stop
root@moloch:~# service elasticsearch status
● elasticsearch.service - Elasticsearch
Loaded: loaded (/usr/lib/systemd/system/elasticsearch.service; disabled; vendor preset: enabled)
Active: inactive (dead)
Docs: http://www.elastic.co

Oct 19 18:13:05 moloch systemd[1]: Started Elasticsearch.
Oct 19 18:13:18 moloch systemd[1]: Stopping Elasticsearch...
Oct 19 18:13:18 moloch systemd[1]: Stopped Elasticsearch.
You should see that it started and stopped correctly, otherwise you have a problem you need to fix before installing Moloch.
Installing Moloch
Finally, we should be ready to install the Moloch software. First, we download it and unpack it, e.g. to /usr/local/src/:
root@moloch:~# cd /usr/local/src
root@moloch:/usr/local/src# wget http://github.com/aol/moloch/archive/master.zip
--2018-10-19 18:16:42--  http://github.com/aol/moloch/archive/master.zip
Resolving github.com (github.com)... 192.30.253.113, 192.30.253.112
Connecting to github.com (github.com)|192.30.253.113|:80... connected.
[...]

root@moloch:/usr/local/src# unzip master.zip
Archive:  master.zip
06ebabe63df3ea8ff7da5d6371fcc9b8c9fadef8
   creating: moloch-master/
[...]
root@moloch:/usr/local/src# cd moloch-master/
Now we call the script named “easybutton-build.sh” to build Moloch. By the way, during Sharkfest 2018 I talked to Steven from Endace and learned that he submitted patches to the Moloch project so that its libpcap version can support professional capture cards like the Endace DAG cards – but that only works if you use the easybutton-build script (and not if you use existing docker images, at least until they are updated, too):
root@moloch:/usr/local/src/moloch-master# ./easybutton-build.sh
This will run for a while, compiling and downloading components. When everything is done, the script will tell you to run “make install” and “make config”, so we do that. There are probably some warnings, but as long as the script finishes you should be good (if not, it’s most likely caused by the wrong node.js version):
root@moloch:/usr/local/src/moloch-master# make install
[...]
The config script will ask you a couple of questions, including what interfaces you want to monitor (in my case not “eth1”, but “ens34“) etc:
root@moloch:/usr/local/src/moloch-master# make config
[...]
Semicolon ';' seperated list of interfaces to monitor [eth1] ens34
[...]
Install Elasticsearch server locally for demo, must have at least 3G of memory, NOT recommended for production use (yes or no) [no] yes
[...]
Download GEO files? (yes or no) [yes] yes
Starting & preparing Elasticsearch
At the end, the script will tell you a couple of additional steps to perform. First, we start Elasticsearch again:
root@moloch:/usr/local/src/moloch-master# service elasticsearch start
Next, we wait for a couple of seconds to give Elasticsearch time to start up before we initialize the database with this command (if it fails with an error message you’re probably trying to soon):
root@moloch:/usr/local/src/moloch-master# /data/moloch/db/db.pl http://localhost:9200 init
It is STRONGLY recommended that you stop ALL moloch captures and viewers before proceeding.

There is 1 elastic search data node, if you expect more please fix first before proceeding.
This is a fresh Moloch install
Erasing
Creating
Finished
Finally, we create the admin user (replace <YOURPASSWORD> with, well, your password, of course:
root@moloch:/usr/local/src/moloch-master# /data/moloch/bin/moloch_add_user.sh admin "Admin User" <YOURPASSWORD> --admin
Added
Starting Moloch
Now we can start Moloch:
root@moloch:/usr/local/src/moloch-master# systemctl start molochcapture.service
root@moloch:/usr/local/src/moloch-master# systemctl start molochviewer.service
As a last step, open a web browser and connect to Moloch on port 8005, e.g. http://192.168.88.130:8005,using the admin user and the password we created in the previous step:

Figure 4 – Moloch Web GUI
…and we’re done.
Final Words
After running (and reinstalling) Moloch for a while I constantly seem to run into trouble with it, because it doesn’t delete old PCAP files. This causes the disk to fill up, stops the database and everything stops working. I have no idea how to fix this yet, but if I find out I’ll update the blog post accordingly.
Thanks!
Have you tried Elastic with OpenJDK instead of Oracle?
No, I haven’t tried that yet because it looked to me like I need Oracle for it and I didn’t want to waste time on experiments with OpenJDK before the presentation at Sharkfest EU. But it’s on my to-do list 😉