Network Forensics Playbook – Banner Inspection and Client Origin
I recently did a hands-on-no-slides presentation at a very small security conference end of last year where I demoed some of the typical things I do when performing a network forensics analysis, using tshark, Wireshark and TraceWrangler. I’ll use these blog posts as a transcript of what I did, so that it’s easy to read up on the various tasks I performed.
Scenario Setup
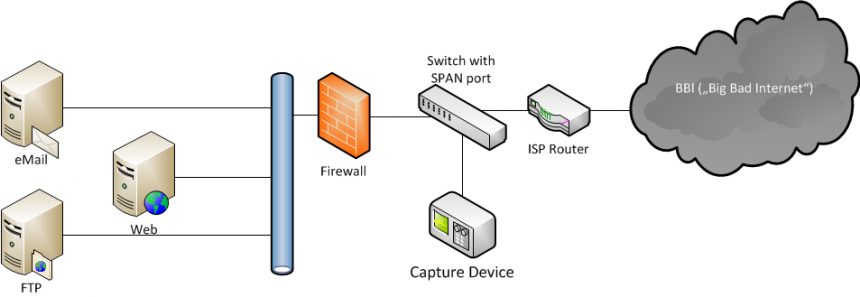
Let’s assume you have a set of capture files taken in front of an internet server infrastructure, e.g. a bunch of virtual servers hosting web pages, email, like this:

Figure 1: ISP Server Setup
All traffic was captured in front of the firewall (Internet facing side) to see what kind of traffic appeared in front of the firewall. This includes a lot of packets that would not have been seen on the inside towards the server infrastructure, because the firewall will drop them for being invalid. The advantage of that capture location is that it’s possible to investigate port scans and other reconnaissance traffic you would not see behind the firewall. Some of the servers had SSH ports open, which are accessible through the firewall.
In network forensics (or any kind of forensics, or even any kind of analysis) you have questions you need to find answers for. Sometimes it can be difficult to ask the right questions, but that’s something that comes with experience – in the beginning, start with simple things and use the results to ask further questions. So let’s start simple.
What does the SSH traffic look like?
In network forensics investigations it is quite common to isolate interesting protocols to take a closer look at what’s happening. SSH is particularly interesting, because it allows remote access to a system, so attackers love to probe ports they can test passwords on (if not configured to allow certificate authentication only). And if they’ve already broken into a system they may use the legitimate SSH port to control it remotely. Looking at the relevant packets may sound like a simple task at first:
- start Wireshark
- load the capture file
- apply a display filter like “ssh” or “tcp.port==22”
- look at the results
Heads-Up #1: Look at the size of that thing!
Loading a capture file is easy when there’s just a few megabytes, but as soon as you get into the range of gigabytes or even terabytes, loading the packets into Wireshark simply won’t work. Often, the capture is spread across multiple files, making it even harder to look at the big picture. In situations like that, the standard way to go is to carve the packets you want to look at via tshark loop and merge them with mergecap afterwards, e.g. like this:

Figure 2: Example carving ssh using tshark
Here’s the transcript for those who don’t want to watch the GIF because they’re impatient, or just because either the font is too small or the colors of my shell (Take Command) are a challenge. And especially for Christian 🙂
dir
mkdir ssh
for %a in (TWDemo*.pcapng) do tshark-r %a -Y "tcp.port==22" -w ssh\%a
cd ssh
dir
mergecap -a TWDemo*.pcapng -w ssh_all.pcapng
First, I create a subdirectory to store the new files in. This has two advantages: I can used the %a variable (containing the current filename) without appending anything, which would be required to avoid overwriting the original if I would try to write to the same directory as the original file. And the directory tells me what I carved from the file set, in case I do multiple runs using different filters.
The tshark parameters I use are:
- -r %a – read the file specified in variable %a (which is filled in by the for loop)
- -Y “tcp.port==22” – apply a display filter to only accept packets that have TCP port 22, either receive or transmit
- -w ssh\%a – write the matching frames to the same filename, but in the ssh subdirectory.
After that, it’s just mergecap in concatenate mode (“-a”) to create a combined file called ssh_all.pcapng.
As a fast alternative you can do the same with tcpdump/windump for simple things like port and IP filters (although you may not be able to process pcapng files, only pcap). tcpdump uses BPF which is much faster than the display filter engine used in the example above, but it’s not as versatile (meaning: you can easily filter on hundred thousands of fields with display filters, which you often can’t with BPF).
The equivalent to the tshark job above could be this bash script:
#!/bin/bash
FILES=*.pcap
for f in $FILES
do
  echo "Processing" $f
  sudo tcpdump -r $f -w ssh/$f "tcp port 22"
done
Heads-Up #2: Choose your filter wisely
Do you know what the difference between the “ssh” filter and the “tcp.port==22” filter is? Most readers probably know that SSH usually runs on TCP port 22, so aren’t both filters identical? Well, let’s find out:

Figure 3: Wireshark filtering on “ssh”
Okay, that looks like it’s ssh traffic. And this is what happens if you filter on “tcp.port==22” instead:
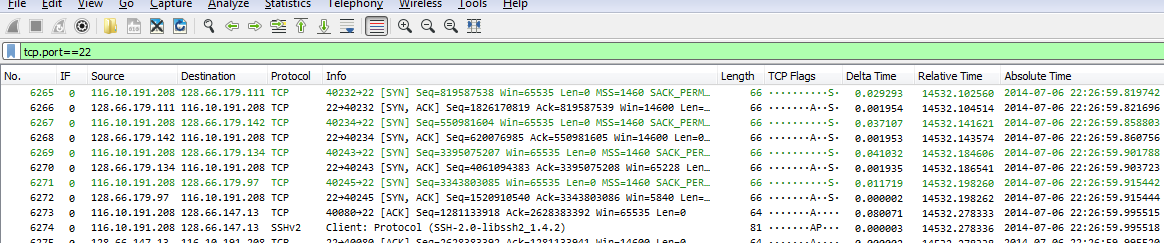
Figure 4: Wireshark filtering on “tcp.port==22”
As you can see, there’s a difference: the port filter will show all packets of the TCP conversations on port 22 (including handshake and acknowledgement packets), while the SSH application filter will only show packets containing SSH content.
So choose your filter wisely, depending on what you want to look at – if you only care for SSH content you can use the “ssh” filter. But that will hide failed connection attempts and port scans, which can be of interest in an investigation as well.
Banner inspection
One interesting thing when analyzing packet of network applications is to check out the banners they often send at the beginning, because they contain product names and versions. It’s also often a good idea to check for unusual banners that may point to malicious activity. So if we want to check the SSH banners sent by the server it would be perfect if we could filter away all the packets that do not contain a banner.
So let’s do a little exercise if you want. Grab my SSH example file and try to come up with a display filter that shows only packets with banners, like this:

Figure 5: SSH Server Banners
I’ll explain how I filtered for the result above in the next part, but only continue and read it if you’ve done the exercise (or just want to know how it’s done – but the learning effect will be considerably less if you haven’t tried yourself first 😉 )
Server Banner Filter
To build a successful filter for the SSH server banner we need to look at the location where it can be found. It’s the first packet the server sends after the three way handshake. The main problem with that observation is that you cannot filter on packet dependencies directly, meaning that something like “give me the first packet after the three handshake packets have been found” isn’t possible without some tricks.
So here’s my filter (use your mouse to highlight it to read it):
tcp.srcport==22 and tcp.seq==1 and tcp.len > 0
Let’s break it into it’s sub elements and see what they do:
- “tcp.srcport==22” – this means that the packet must be on TCP port 22 (which is SSH under normal conditions), and the packet must originate from port 22, which means it must come from the server. “tcp.port==22” wouldn’t work, because that would include packets to and from port 22, but we want something the server sent.
- “tcp.seq==1” – this is the trick we need to get an early packet in the conversation. This part may seem harmless, but it isn’t: it only works if your Wireshark is configured to work with relative sequence numbers (it’s a TCP protocol setting you can find in the preferences dialog, or via the pop-up menu of the TCP layer in the decode pane:
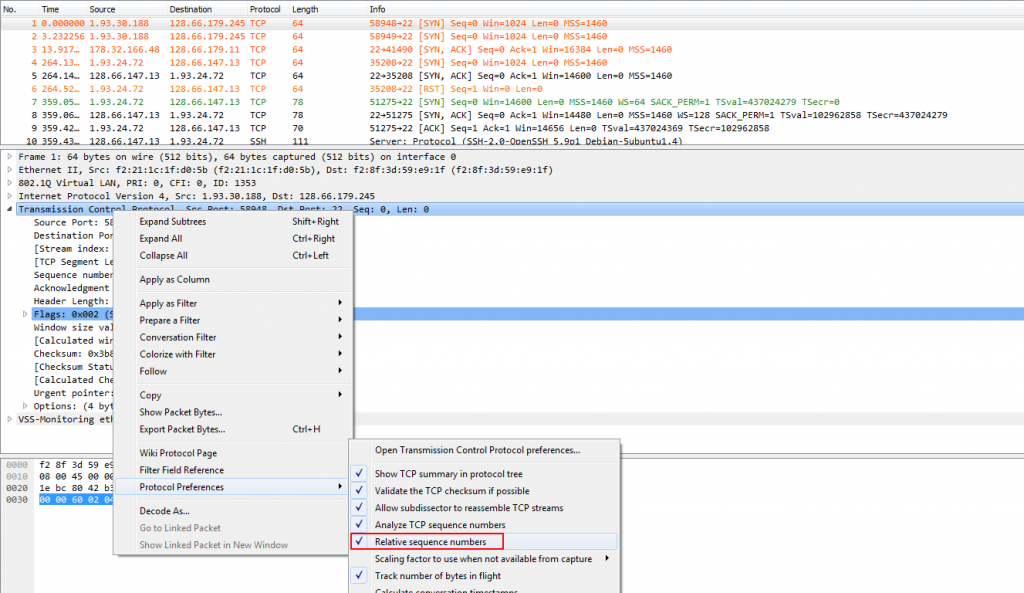
Figure 6: toggling TCP relative sequence numbers
If you’re asking now what relative sequence numbers are: it’s a feature of Wireshark reducing the usually very high 32 bit number down to zero for the SYN packet, and start from there. Basically, each following sequence number is displayed as a value relative to the initial sequence number. Which means that if you see a relative sequence number on 1 there hasn’t been any TCP payload data yet (because that would increment the sequence number).
- “tcp.len > 0” forces the TCP payload to be not empty – otherwise we’d also get some ACK packets that do not carry anything.
Client banner filter
In case of inspecting SSH it is much more interesting to see what SSH client banners we see, because the server banners are coming from devices we have control over – so there should be no surprises (unless someone infiltrated a server and started an SSH service without our knowledge 😉 ). Modifying the filter for the server banners to display client banners instead is pretty simple: just reverse the packet direction you’re looking for.
Determining SSH client geo location
Lets say the SSH service is used for access for legitimate users strictly connecting from Germany. During an investigation it may be interesting to see if there successful connections from other countries as well in the captured packets, because that could mean someone stole or guessed credentials or SSH client certificates. To check the geolocation of a connection your Wireshark installation needs to have a working GeoIP resolution configured:

Figure 7: GeoIP source country location
Now, checking source countries per connection by looking at packet decodes is way too much work (unless you’ve got a bored intern that needs something to do 🙂 ), but fortunately there are better ways:
- Using a custom column in Wireshark to display the source location field value in the packet list
- Using tshark
To add the Wireshark custom column, simply find the field you want to add, and use the pop-up menu to apply it as a new column:
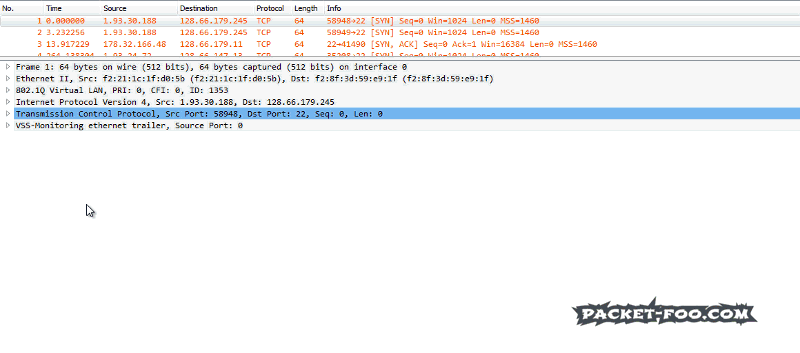
Figure 8: Add GeoIP country column to Wireshark
While having a source country column is nice, it still means that you have to scroll through all the packet in the file, which isn’t that efficient either. I prefer using tshark, e.g. like this:
[C:\Traces\demo]tshark -r ssh_all.pcapng -Tfields -e ip.geoip.src_country
China
China
France
China
Italy
China
[...]
Of course this is still a long list, so I use the additional command line tools “sort” and “uniq” (for Windows I install the UnxUtils from SourceForge), and pipe the tshark output into them (sort first, then reduce to unique entries):
[C:\Traces\demo]tshark -r ssh_all.pcapng -Tfields -e ip.geoip.src_country | sort | uniq -c
 2 Argentina
 4 Brazil
 10995 China
 7 China,Italy
 62 France
 7681 Italy
 2 Italy,United States
 282 Korea, Republic of
 2 Mexico
 53 Netherlands
 15 Romania
 6 Seychelles
 325 United States
 564 Vietnam
It takes a while depending on the capture file size, but in the end you’ll get a nice list (with a occurrence count by specifying the “-c” parameter for the uniq command. By the way, you can do the same on Windows without the “sort” and “uniq” tools from Sourceforge by using Powershell instead (but without the counter):
PS C:\Traces\demo> tshark -r .\ssh_all.pcapng -Tfields -e ip.geoip.src_country | Sort-Object | Get-Unique
Now there are two unusual entries in the list above: “China,Italy” and “Italy,United States” – how can a single packet have two different IP source countries at once? I challenge you to find out 😉
Final Words
Network Forensics is about answering questions, mostly “Who did what when where, and why?”. Depending on the task you should leverage different tools, including Wireshark, tshark, mergecap, and others that I didn’t use in this post (e.g. Network Miner). Start asking yourself simple questions first, and dig deeper if you find something that seems odd or interesting.
Update: for those of you who prefer to work with tcpdump there’s a cheat sheet available here as PDF and JPG.
I found that tcpdump is a lot faster than tshark to extract interesting packets from a trace file. Here is the command line
tcpdump -r myfile.pcap -w interesting.pcap port 22To process a bunch of files I use this command on a Linux system:
for i in $(ls *.pcap); do tcpdump -r $i -w interesting_$i port 22; doneOf course, tcpdump is much more limited in it’s filter capabilities than tshark. All the powerful magic like location-based filtering or extracting individual fields is only available to tshark-users.
Great posting
Sorry, your comment ended up in the SPAM queue for whatever reason, and only found it just now…
Hi Jasper,
Thanks for the article. An approach from the security perspective is very interesting topic.
As for you questions.
1. Banner grabbing.
I tried to leverage “ssh.protocol and tcp.srcport ==22” filter and got 376 displayed packet. Using your folter I got 401 diplayed packet. So I wondered about that difference and realized, that your filter is able to pass retransmissions containing banners while mine isn’t.
If I use ( and !tcp.analysis.flags) filter, I get 378 packets displayed. The difference has been decreased to 2 packets. These are no.9919 and no.13302 and actually it seems these two are false alarms 🙂
in the opposite direction the difference between our filters were exactly retransmissions, no false alarms this time.
I admit your filter is capable to grab more, and often to grab a little more than needed is better than grab less than needed.
2. Two countries.
GeoIP detection uses IP addresses, layer 3 (which is not so strange actually:)). So to get two different country codes we must have two source IP’s in one packet, and sometimes this might be the case with one particular protocol… I’ll leave the rest for other people 🙂 Cool question!
“If I use ( and !tcp.analysis.flags) filter”
should read
“”your filter” and !tcp.analysis.flags”.
Comments parser doesn’t like some symbols I’ve used and it stripped them 🙂
Thanks, Vladimir, and very interesting observations regarding the ssh.protocol filter – haven’t tried that one myself yet. And of course you’re right about multiple IP layers – see also my comment toward Matthieu 😉
“how can a single packet have two different IP source countries at once?” > Maybe an ICMP destination unreachable which contains a copy of the header of the orignal packet ?
Thanks for another excellent post.
Yes, that’s correct – any ICMP packet carrying quoted content will cause this, because the Wireshark dissectors are decoding the quoted IP header just as any other, so you end up with two IP layers in one packet. Other reasons can be IP-over-IP or other tunneling techniques. To verify your assumption you can use a display filter to find the packets in the file, e.g. by filtering for
ip.geoip.src_country == "United States" and ip.geoip.src_country == "Italy"and then check the decode pane.
And thank you, you’re welcome!
Hi Jasper,
could you paste the commands of Figure2 below the Figure.
So I can read them easier…
Thank you!
Cheers,
Christian
Sure thing, done – should have done that from the start.
Thank you very much!
Now I can easily copy one of the best hints:
for %a in (TWDemo*.pcapng) do tshark-r %a -Y “tcp.port==22” -w ssh\%a