A look at a portable USB3 network TAP
A while ago I wrote a post for LoveMyTool about how I managed to power my Garland Gigabit TAP with a USB cable, which got me into a discussion about the ProfiTap USB3 device on Linkedin. I had used 100Mbit USB2 ProfiTap devices before and had some issues with it on Linux, so I was a bit skeptical towards the new ProfiShark 1G as well. In the end, the nice people at Comcraft offered to send me a sample to see how it performed, and I am always happy to get my hands on interesting capture solutions to see how they perform.
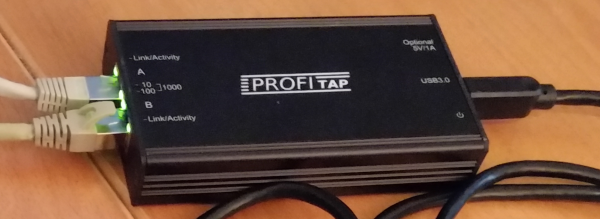
The ProfiShark 1G is a pretty small and portable aggregation TAP, which means that it combines receive and transmit (RX/TX) of a link into a single stream of packets which is then captured by the analyzer. Other than all the TAPs I own it is unique in the way it transports the network frames to the PC, because instead of RJ54 based network cards it uses a USB3 connection. While this may seem odd it has a couple of advantages (as long as the PC has a USB3 port, which should be pretty common by now). There are also a few minor disadvantages, if you want to call them that.
Advantages
Supports Wireshark and other tools
The ProfiShark 1G appears as a capture card in Wireshark/tshark/dumpcap as soon as you installed the ProfiShark driver and restarted the NPF driver to have it detect the new device (either by rebooting or doing a “net stop npf” and “net start npf”). The new driver installer version 1.0.7 will do this automatically while the one I had (1.0.6) didn’t yet.
USB 3 powered
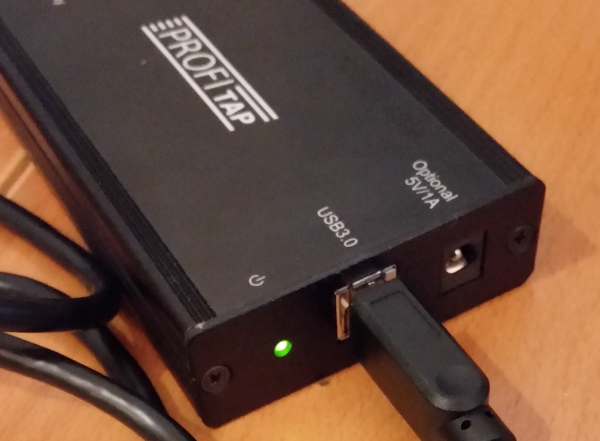
The USB3 port powers the TAP without the need of an additional power source during the capture, so you don’t need to find a power socket for an additional power supply. This is pretty useful when you’re using a laptop and don’t have additional power sockets available (and boy, do we all have been in that kind of situation at customer sites)
Lossless Full Duplex Link aggregation
USB3 has a total throughput of up to 5 GBit/s, so it has no trouble transporting the combined 2GBit/s of a fully utilized duplex Gigabit link to the analyzer without dropping frames due to overload, which an aggregation TAP normally can’t achieve over a single RJ45 connector. In all my tests the TAP did not drop a single frame, no matter how much load I put on the link.
USB utility
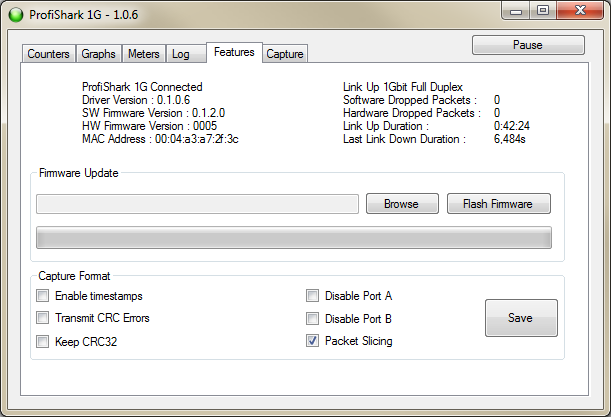
The ProfiShark 1G comes with a USB utility that allows seeing the status and configuring the TAP in an easy way.
While I don’t care about most of the status displays they may help at one point or another, but I could live without them. More interesting are the capture options you can set, which I’ll explain in greater detail later in this post. The utility can also be used to capture packets directly, writing either PCAP, PCAPng or ERF files.
Keeping your NIC available
By using USB3, the network card in the capture laptop is not blocked , so you can stay connected to the network if you need to while capturing without interfering with the capture process. This is a minor advantage in my eyes, but it may be helpful nonetheless, e.g. to transport captures of the laptop to another location while the capture is still running (which would require fast disks to avoid any impact on the write performance of the running capture, of course)
Disadvantages
RJ45 and SFP based professional capture devices
You can’t use this TAP with capture devices that are purely RJ45 or GBic/SFP based. You’ll need a device with an USB3 port for this TAP to work as intended. So if you’re using a professional capture or security appliance equipped with expensive FPGA based network capture cards this TAP is not for you.
External power
I already mentioned that one of the advantages of the TAP is that it draws power from USB3. The problem with that occurred to me during a real world capture job I used the ProfiShark in. Imagine you’re capturing in a cold, noisy data center. You bring the laptop, insert the ProfiShark into the link, and start capturing. So far so good. Now, you need to take a look at the packets after you ran some tests that should have reproduced the problem. Most likely you don’t want do to that standing in a data center row, with the laptop in your hands – instead, you’d go somewhere quiet (and with big monitors to see as much as you can). Which means that the TAP will lose power as soon as you disconnect it. That is no problem as it will do a layer 1 fallback, but it can interrupt the link for a short moment, and again when you plug it back in.
The engineers have thought of that though, and provide an optional 5v connector to power the TAP without being connected to USB – but you need to have an additional power supply for that. At least in my box there wasn’t one. It’s not really a big thing, but something to consider in data center capture situations – most people do not like link down synchronizations happening too many times in data centers 😉
Link Aggregation only
The ProfiShark is link aggregation only, which means that if you’re using any capture application other than the USB utility you won’t be able to see the interfaces the packets where captured on later. E.g. if you use Wireshark to capture with the TAP you’ll see all packets having the same interface ID. This is a minor problem, too, because if you really need to see the interface index, you can use the USB tool to write PCAPng or ERF files directly, preserving the index.
The USB utility
While it’s nice to have the graphs and counters in the USB utility, it’s real value is in the capture options it can configure on the ProfiShark as well as the ability to write capture files without having to start dumpcap or Wireshark first. It also allows updating the Firmware.
Enable Timestamps
When enabling timestamp, the TAP adds an additional timestamp record trailing the Ethernet frame, which Wireshark can decode as soon as you install the ProfiShark DLL into the plugins directory of Wireshark. This will give you a timestamp resolution of 8 nanoseconds instead of the normal PC milli- to microseconds.
If you don’t install the plugin Wireshark will decode the bytes as VSS monitoring timestamps, which results in funny values.
Transmit CRC Errors
With this setting the ProfiShark will accept and transfer broken frames to the capture PC, so you can record physical problems that way. I tried but could not pick up any such frames, which speaks for the quality of my networks I guess.
Keep CRC32
As most of you know, normal PC captures do not keep the Ethernet FCS (a CRC32 checksum), which is why we almost never the FCS in a capture. With this option the FCS is provided by the tap, so you can finally capture full frames of 1518 bytes and check the FCS. I had a little problem with this, but it was fixed in a new firmware sent to me on short notice (which allowed me to test the firmware upgrade procedure, which worked without any problems).
Disable Port A / Display Port B
When either Port is disabled you’ll not receive packets seen on that port. The communication on the link itself is not disturbed, but the capture will only see on side of the conversations. I have no idea why anybody would want to do this, but there is probably some reason for this setting. BTW, disabling both ports does in fact get you an empty capture file… 🙂
Packet Slicing
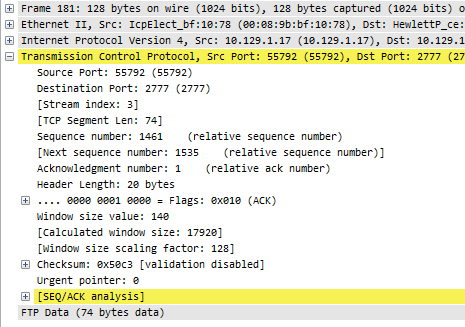
Now this may be an interesting setting, as it limits the packets to a hard coded size of 128 bytes and cuts away the rest. Many “intelligent” TAPs offer a feature like that to reduce the load on the capture device. The big problem with this is that the analyzer only sees 128 bytes and doesn’t know how big the frame really was. This is exactly what happens if you choose to use Wireshark to capture like this, resulting in the problems we seen in the next screenshot:
At first it seems like the TAP or the laptop dropped a ton of packets, but that’s not the case. If you look at the packets you’ll see the problem (I hope):
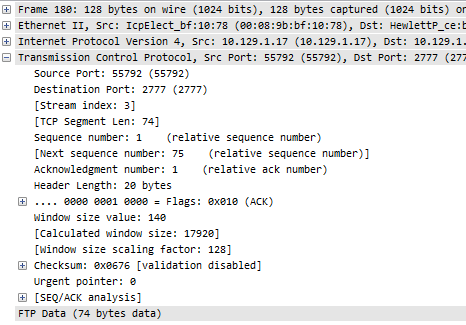
In frame 180, the “Next expected sequence number” is 75, because the frame only seems to carry 74 bytes of payload (while it truth it had been 1460 bytes, which would mean that the next sequence is 1461). So when the next frame is analyzed, Wireshark thinks that there is a gap:
This is caused by the hard slicing at 128 bytes, and can’t be helped because the TAP has no way of telling Wireshark the real wire size. But fortunately there’s a workaround if you need this kind of feature: if you use the ProfiShark USB utility to capture the packets, it will write the wire size to the ERF or PCAPng headers (which didn’t work at first, but the firmware update I mentioned fixed that, too). Problem solved.
Final words
The ProfiShark 1G is an interesting device for laptop captures, because it is small and works with just an USB3 port while doing aggregation without packet drops. It’s not a TAP you want to put into your network permanently though, and I don’t think that’s what it was designed for anyway. If you need TAPs to put in once and stay you are probably better off with a RJ45 based TAP. Other than that, it’s a useful TAP to carry in your laptop bag.




Thanks for the review Jasper – I actually ended up buying 2 of these.
Did you ever come across issues with timestamps?
When I capture directly from the TAP without going through Wireshark, the timestamps are all over the place. We’re talking packet #1 at 0.000000000s and packet #10 came in 1.6 billion seconds later. To top it off packet #11 came in at -1.6 billion seconds, that is years before I started the capture…
Am I not getting something basic here, or are my taps a few screws short?
Did you enable capturing with the TAP hardware timestamping feature? If so, try disabling that feature and check again – if I remember correctly the timestamp is added as an Ethernet trailer and the default Wireshark way of interpreting those isn’t compatible with what the TAP does – if you want to use the exact TAP timestamps you need the Wireshark plugin for interpreting those values correctly.
It was my mistake. In Direct Capture mode the timestamps are written on all frames with 8ns accuracy regardless of any setting on the tap, and you don’t need any additional dissector to read the trace file correctly in Wireshark.
However, you must remember to disable the ProfiShark dissector if you have it installed – or else Wireshark tries to decode timestamps that are not there. The ProfiShark plugin should only be enabled when using Live Capture in conjunction with “Enable timestamps in live capture” on the tap.
Lesson learned:
Keep your tongue straight when working with the different settings on the tap and in the dissector in Wireshark – if not the results will be timestamps all over the place 🙂
Thanks for the feeback, Skjalg, good to know!
Hi Jasper, I am in search of portable capture hardware capable of 10Gbps and I am considering the current 10G version of this device. I realize this review is from a few years back. Would you still recommend a ProfiShark device, or possibly something else? Thanks for the review and all your Sharkfest work!
So far the Profishark works fine, so the 10G version looks like a good choice. I met the ProfiTap guys at Sharkfest EU and they really know their stuff. I also know of a friend of mine who had some issues with the 1G device which they solved quickly.
What is the cost of this unit??
I’m not sure, but it’s a low four-digit number, like most Gigabit copper TAPs (real TAPs, based on FPGA chips). Just ask the guys at ProfiTAP, they’ll be happy to help.
I found this recently that has the capability to do tap up to 1G. Q-linx LanProbe https://qlinxtech.com/lanprobe