PCAP Split and Merge
Sometimes it also happens during network troubleshooting engagements, but it is also common for analysis jobs regarding network forensics: dealing with huge number of packets, sometimes millions or more. Two typical situations may have you scratch your head: either you have one huge file containing all packets at once, or you have a ton of small files that you need to look at. So let’s see how we can still tackle both.
The problem with the capture file size
First, let’s look at having only one huge file to deal with, which in my case starts at about above 256MBytes in size. I often setup my captures for file sizes of 128 or 256MBytes, because they are still “okay-ish” when opened in Wireshark – it takes some time to load and filter them, but it’s not too bad. But when I end up with files larger than that – sometimes more than 10GBytes in size – that won’t work anymore. It’s not so much that Wireshark can’t load the file – because it often can, at least the recent versions. The developers worked hard on improving this, and you can now open files that you couldn’t a couple of years ago.
But the initial loading of a file isn’t the time-consuming part when you perform a packet analysis task – filtering is. Each display filter you apply re-reads the whole file from disk. Each and every time, because Wireshark doesn’t keep packets in memory, except the one packet currently decoded and displayed. So if you apply a filter in any way, Wireshark needs to read all packets again to check if they match the current filter condition. And this means that working on large files will be slow, and as always, time is something you often do not have when you’re troubleshooting or perfoming a forensic investigation where getting to results fast is critical.
Pro Tip: use the “find” function (Shortcut: CTRL-F) in Wireshark with a filter expression to find matching packets without applying the filter itself. This can often save a lot of time.
Splitting a big capture file
If you have a big file you can quite easily split it into smaller files,using editcap. editcap is a command line tool that is installed together with Wireshark. This is why it is a good idea to add the Wireshark installation path to your path variable so that you can run the command line tools everywhere. Anyway, back to editcap: I dub it the “Swiss pocket knife for PCAPs”, because it has a lot of options to process capture files. I often use it to cut big files into smaller chunks like this:
[C:\traces\demo\]editcap -c 100000 bigfile.pcapng smallfile.pcapng
The “-c” parameter tells editcap to cut bigfile.pcapng into smaller files of 100,000 packets each, which (in my experience) usually results in files with 64-100 MBytes in size. Of course this depends on the packet sizes in the original file. You could also use “-i <seconds per file” instead, but I don’t like that as much, because there may be traffic bursts that lead to some very big files and some very small files. If you’re wondering why there is only one output filename instead of many: editcap automatically appends a timestamp to each file it creates, making the result look like this:
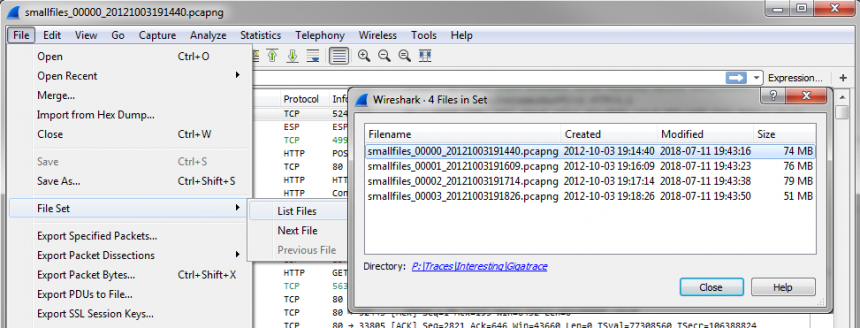
11.07.2018 19:43 74.082.680 smallfile_00000_20121003191440.pcapng
11.07.2018 19:43 76.672.476 smallfile_00001_20121003191609.pcapng
11.07.2018 19:43 79.812.736 smallfile_00002_20121003191714.pcapng
11.07.2018 19:43 51.724.288 smallfile_00003_20121003191826.pcapng
The good thing is that the format of the file names is “compatible” with Wireshark, making it possible to navigate it as a file set:
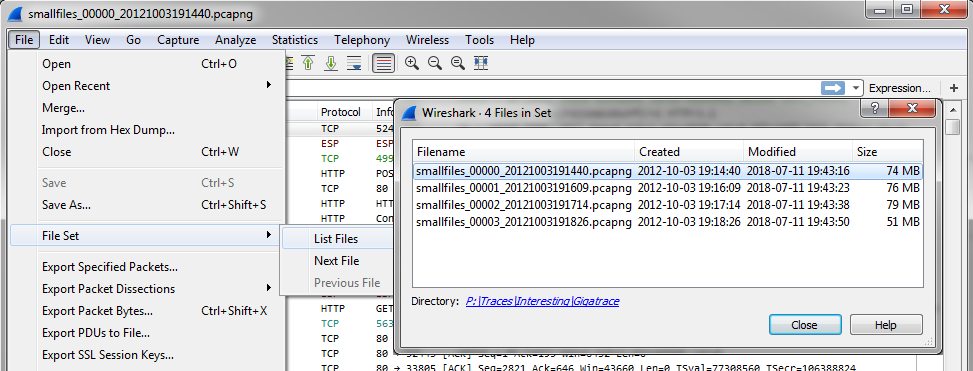
Figure 1 – Wireshark File Set
By the way, converting capture file formats can also be done with editcap, using the “-F” parameter. For example if you need PCAP formatted files, use this command (some editcap versions may require “libpcap” instead of “pcap” as format value):
[C:\traces\demo\]editcap -F pcap capture.pcapng capture.pcap
If you have multiple files, run a batch job, like this (e..g. on Windows command line):
[C:\traces\demo\]for %a in (*.pcapng) do editcap -F pcap %a %a.pcap
This will convert all files in the current directory to PCAP format. Editcap can tell you all the file formats it supports if you run it with an empty “-F” parameter:
[C:\traces\demo\]editcap -F
editcap: The available capture file types for the "-F" flag are:
5views - InfoVista 5View capture
btsnoop - Symbian OS btsnoop
commview - TamoSoft CommView
dct2000 - Catapult DCT2000 trace (.out format)
erf - Endace ERF capture
eyesdn - EyeSDN USB S0/E1 ISDN trace format
k12text - K12 text file
lanalyzer - Novell LANalyzer
logcat - Android Logcat Binary format
logcat-brief - Android Logcat Brief text format
logcat-long - Android Logcat Long text format
logcat-process - Android Logcat Process text format
logcat-tag - Android Logcat Tag text format
logcat-thread - Android Logcat Thread text format
logcat-threadtime - Android Logcat Threadtime text format
logcat-time - Android Logcat Time text format
modpcap - Modified tcpdump - pcap
netmon1 - Microsoft NetMon 1.x
netmon2 - Microsoft NetMon 2.x
nettl - HP-UX nettl trace
ngsniffer - Sniffer (DOS)
ngwsniffer_1_1 - NetXray, Sniffer (Windows) 1.1
ngwsniffer_2_0 - Sniffer (Windows) 2.00x
niobserver - Network Instruments Observer
nokiapcap - Nokia tcpdump - pcap
nsecpcap - Wireshark/tcpdump/... - nanosecond pcap
nstrace10 - NetScaler Trace (Version 1.0)
nstrace20 - NetScaler Trace (Version 2.0)
nstrace30 - NetScaler Trace (Version 3.0)
nstrace35 - NetScaler Trace (Version 3.5)
pcap - Wireshark/tcpdump/... - pcap
pcapng - Wireshark/... - pcapng
rf5 - Tektronix K12xx 32-bit .rf5 format
rh6_1pcap - RedHat 6.1 tcpdump - pcap
snoop - Sun snoop
suse6_3pcap - SuSE 6.3 tcpdump - pcap
visual - Visual Networks traffic capture
A word of warning – some formats may not be able to be converted to each other, depending on how different the formats area.
Working with a file set
In many situations you end up with a set of files, sometimes thousands of them. As an example, the popular SecurityOnion distribution captures files of about 160MByte each:
19.06.2018 02:06 160.365.341 snort.log.1529366405
19.06.2018 02:08 159.951.916 snort.log.1529366801
19.06.2018 02:12 160.134.953 snort.log.1529366891
19.06.2018 02:14 160.052.639 snort.log.1529367123
19.06.2018 02:16 159.996.030 snort.log.1529367278
This sometimes making it a challenge to extract flows that are present in more than one file (e.g. starting in the first file, ending in the fifth). To solve that problem you have two major options:
- Merge all capture files together first with mergecap (also part of the Wireshark command line tool set) and carve the flow you need from the big merged file. The main problem here is that you may end up with a file so big that most carving tools cannot process it anymore.
- Cut the partial flows from each partial file and merge the extracted packets together as a final step. This often works best, e.g. using tshark or tcpdump in a batch job on all files and mergecap afterwards.
The mergecap syntax is pretty easy (e.g. when trying to merge the snort files listed above):
[C:\traces\demo\]mergecap -a -w snort_all.pcapng snort.log.*
The “-a” parameter tells mergecap to concatenate files instead of merging them by frame timestamp. For that you should make sure your file names are listed in chronological order, otherwise you’ll have time jumps in the merge file. In that case just omit the “-a” parameter and let mergecap sort the frames for you.
Pro Tip: there are some older versions of mergecap (1.x, I can’t remember exactly) which do not work with wildcards, requiring you to specify all files instead. I recommend getting a newer Wireshark installation instead of doing that.
Extracting packets with context
Very often we need to extract specific packets from a big pile to investigate what’s going on. This is especially true for network forensics investigations, but also for some network analysis jobs where you have a 24/7 capture running and need to find the packets of a specific conversation. There is a range of tools for that kind of thing, and I’ll cover a few of them now. I found a lot of tools in general, but I skipped all that were either too outdated, or didn’t produce packet extractions (like tcpflow, which extracts the contents on top of TCP, not the packets themselves).
Wireshark
Of course you can use Wireshark to extract packets from your capture files. It’s probably the most versatile tool to do that, too (together with tshark). The power comes from the sheer amount of display filters that you can apply to get what you want, and saving the filtered results to a new file. In most situations this would mean to apply a conversation filter to isolate a single TCP connection. Or a couple of them. On the other hand, Wireshark may be too complicated to use for an extraction task, because it requires a high amount of manual interaction to get the results you need.
The typical steps are:
- find the filter criteria you want to use (usually a conversation filter like “ip.addr==192.168.0.1 and ip.addr==10.0.0.1 and tcp.port==54321 and tcp.port==80”)
- open the first file
- apply the filter
- save results to a new file via the File -> Export Specific Packets (not “Save As”! But don’t feel bad if you do, everybody does by mistake. I still do)
- open the next file, and repeat from step 3 until you’re sure you got everything (hint: loading a file with a display filter still applied will speed things up)
- merge partial results together (if required – you can do that in Wireshark, too. Check out the Merge option in the File Menu, or simply drag & drop multiple files on the UI 😉 )
- repeat with another filter (if required)
Pros
- All platforms
- extremely powerful
Cons
- one file at a time
- requires a lot of manual work
- not very fast
- may run into trouble with huge files
Pro Tip: there is a little known/overlooked feature in Wireshark where you can apply a load filter, letting only matching packets pass while loading the file. The syntax is simply display filter syntax, so it’s quite powerful:
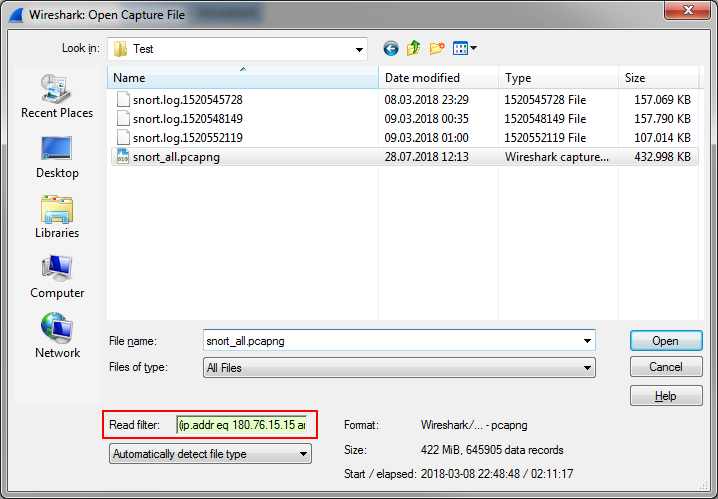
Figure 2 – Wireshark File Sets
tshark
tshark is awesome for extracting packets, because it has all the display filters Wireshark has and you can script it, e.g. performing batched extractions like this on your whole file set:
[C:\traces\demo\]for %a in (*.pcapng) do tshark -r %a -Y "ip.addr==192.168.0.1 and ip.addr==10.0.0.1 and tcp.port==54321 and tcp.port==80" -w %a_conversation1.pcapng
Final step is to merge all extracted files together and you got your conversation, e.g. like this:
[C:\traces\demo\]mergecap -a -w conversation1_all.pcapng *_conversation1.pcapng
tshark sometimes runs into trouble with protocols it cannot dissect correctly (you get error messages on the console), and it’s also slowed down by using protocol dissectors that aren’t relevant for what you’re doing. E.g. if you filter on conversations by IP and ports – which is by far the most common way – all application protocols simply do not matter. In that case I create a specific profile that only uses the dissectors I really need in Wireshark, like this:
- start Wireshark
- create a new profile for tshark (I often name this one “tshark”)
- disable all protocols
- enable the protocols you need (usually: Ethernet, IPv4/v6, TCP, UDP/UDPLite)
Figure 3 – Wireshark Enabled Protocols
Then run tshark with your new profile by specifying it with the “-C” parameter followed by the profile name:
[C:\traces\demo\]tshark -C tshark -r capture.pcapng -Y "ip.addr==192.168.0.1 and ip.addr==10.0.0.1 and tcp.port==54321 and tcp.port==80" -w filtered.pcapng
Pro Tip: when new Wireshark versions are released, new protocol dissectors added to the code are enabled by default, so you might want to check your reduced profiles and disable the new dissectors unless you need them.
Pros
- All platforms
- extremely powerful
Cons
- requires multiple runs over the file set for each filter you need to apply
- still not very fast for big amounts of packets
- may not be able process huge files
tcpdump
tcpdump is very similar in usage to tshark, with one key difference: it doesn’t support the hundreds of thousands of display filters tshark has, so it’s much more limited in what you can filter on. But on the upside tcpdump also has one big advantage: since it can filter using BPF without the display filter engine overhead, it’s fast. Very fast. And if you only care about things like conversations, it’s probably the best command line tool there is for that task.
The same filter used in the tshark example above would look like this when using tcpdump (now using BPF syntax, of course):
tcpdump -r capture.pcap -w filtered.pcap "host 192.168.0.1 and 10.0.0.1 and tcp port 54321 and 80"
Keep in mind that tcpdump cannot write the pcapng file format yet, and only reads pcapng if the libpcap version it uses supports it. There also is a Windows version called windump, but it seems to be discontinued and is limited to pcap files only. So if you want to run it against a set of pcapng files you need to convert them first, which also takes time.
Pros
- Most platforms (windump.exe for Windows)
- works with huge files
- extremely fast
Cons
- requires multiple runs over the file set for each filter you need to apply
- may only work with pcap files, requiring conversion of pcapng files first
- filtering limited to BPF syntax
- cannot write pcapng format, so it may lose some meta information
TraceWrangler
I once filtered hundreds of conversations from a set of hundreds of files using Wireshark and it took two days. Since then I have learned to do it in smarter ways, e.g. by using tcpdump instead of Wireshark. But that still requires running over the file set hundreds of times instead of just once. So I added extraction capabilities to TraceWrangler, and even though it’s nearly not as powerful as tshark or even tcpdump when it comes to the filter engine, it is very convenient to use. And it only requires one run to extract to multiple filters at the same time. And there is also a special mode where it can extract conversations based on Snort alert file results, which I blogged about here.
There are two main ways of extracting packets with TraceWrangler: either via the Conversation Summary, or by using an Extraction Task.
Conversation Summary
Think of the conversation summary like the conversation statistics in Wireshark, but aggregated over all files in the current file list:
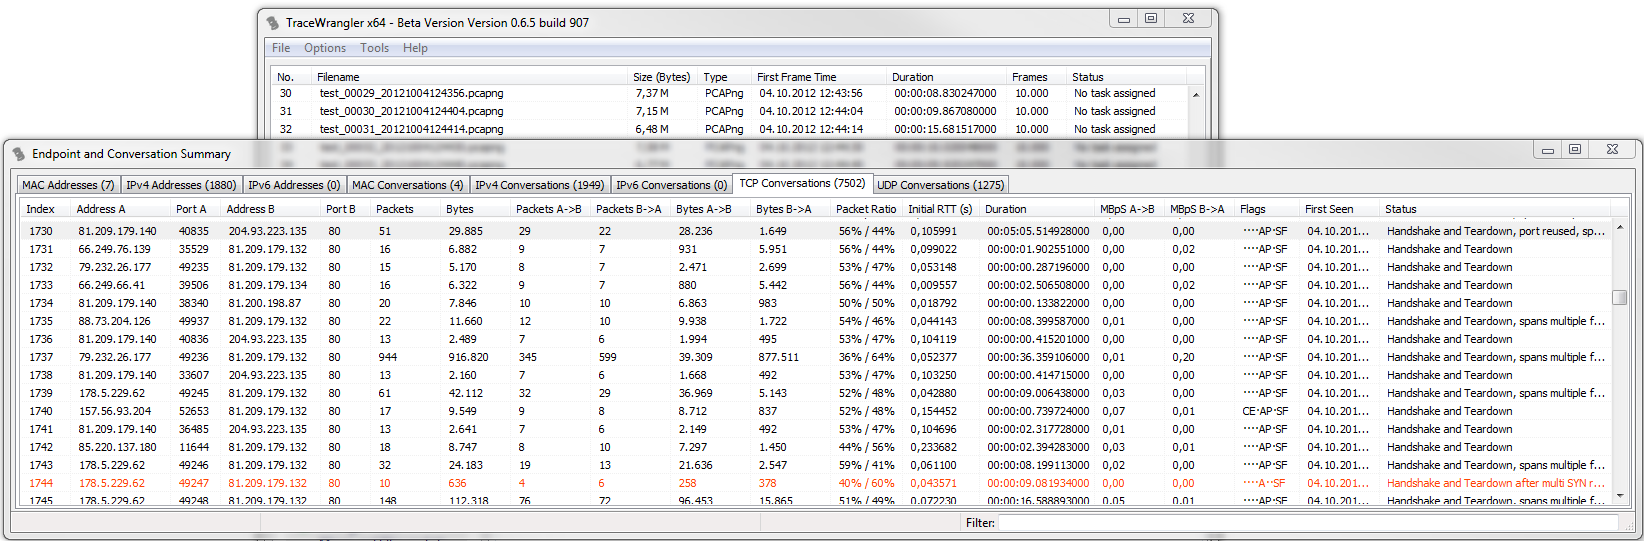
Figure 4 – TraceWrangler Conversation Summary
Double clicking any row extracts the full conversation to a temporary file and opens Wireshark with it. You can also select multiple rows and use the popup menu instead, or toggle aggregated mode (CTRL-O) to have all conversations listed below the respective IP pair. The table also has a couple of extra values Wireshark doesn’t have (yet), e.g. the iRTT (if available), the packet ratio (indicating which IP sends how much of the total traffic), or a Status column which shows details about handshake and teardown (still has some issues I need to fix).
Extraction Tasks
Extraction tasks are used to extract packets by various criteria, e.g. by adding a filter for all conversations of a specific IP pair:

Figure 5 – TraceWrangler extraction task filters
Extraction tasks are quite powerful through a feature that doesn’t look like much: the output filename pattern.With that pattern you can control in which file the extracted packets will end up, e.g. splitting them by socket pairs, or IPs, or VLANs and many other values.
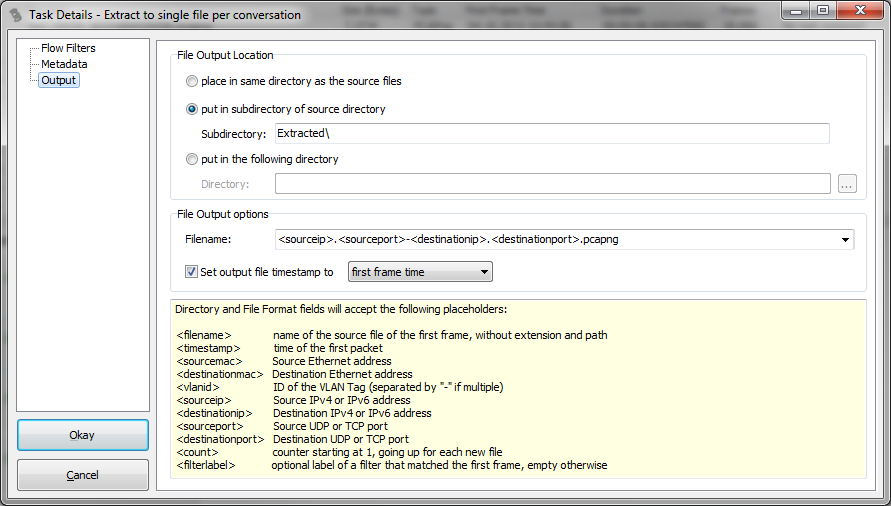
Figure 6 – TraceWrangler Extraction task output pattern
Depending on how you set it TraceWrangler will aggregate packets into output files. By default this will be files based on the socket pairs (both IPs and ports), but you can set it to something like <sourceip>-<destinationip> if you want all packets of each IP pair in a single file. It may be noteworthy that you can also use the placeholders for the directory values, e.g. creating a directory for the IP pairs and socket based file names inside of them.
Pros
- works with file sets of unlimited size (depends on available RAM, mostly)
- can extract packets into many files in a single run
- can perform complex extractions based on indicator packets
Cons
- Only Windows as of writing this blog post
- filtering is very limited
- does not write pcap, only pcapng (yes. some people keep asking for pcap support)
Honorable mentions
There are a couple of tools I didn’t cover here, but still wanted to list:
- SplitCap by NetReSec, running on Windows
- tcpflow, extracting TCP payloads (so do not expect PCAPs as output)
Final words
The main takeaway should be this: it doesn’t matter if you have one big file or a set of small files, because you can easily turn them into each other (again and again, if you like):
- Big file: editcap -c, leading to a file set
- File set: mergecap, leading to a big file
So in the end it’s irrelevant how you captured your packets, as long as you did capture them. The only drawback of having to merge or split them is that it takes time for the file operations – and that can get significant for TByte sized amounts of packets, especially if you also have to convert from pcapng to pcap or vice versa.
There are a number of other pcap-related tools available that may be of interest to some readers. The Wireshark wiki Tools page lists many of them: https://wiki.wireshark.org/Tools#Monitoring.2Ftracing_tools.
Thanks, Chris, good point!
The windows application pcapdatacopy I put together a while ago is on the wiki tools list. You can use it to merge pcap files and also create a filtered pcap file from a single or multiple files based on the source and destination ip addresses. For parsing huge files I find it quicker to use, another feature I regularly use is to create a raw copy of the payload data which is great for analysing text based messages.
Thanks Stuart, never heard of that one but it sounds useful!
Hi Jasper, thanks for the highly useful posts as usual. I noticed a minor type: “The main problem here is that you may end up with a file so big that most carving tools can process it anymore.” –> s/carving tools can process/carving tools can NOT process/
Cheers
Joao @sec_joao
Hi Joao, thank you! And I fixed the typo, thx for letting me know!
Cheers, Jasper
Hi Jasper,
thanks so much for this useful blog.
If I had 3 pcapng files with 3tb each for „Multi Segment analysis“ (loss, Delay between points in the network), how can I carve them to make sure they all start from the same packet and all the stuff before this 1st common packet is removed from pcaps? Thank you and have a nice xmas
3TB each? That’s quite a challenge I’d say… can you filter them down to the two IP addresses that are talking to each other first, or are they the only ones in the files anyway? Because that’s what I would try – reduce the size to packets that matter, based on IPs and ports. Even tshark will probably not be able to read 3TB in a single file, so you might have split the files first, write a batch to extract unique IP/Port pairs (via parameters -Tfields -e ip.src -e ip.dst -e tcp.srcport -e tcp.dstport | sort | uniq) to see which ones are present in all three locations. Then run another tshark batch to extract those flows and compare them. You might need to do the same for UDP if that’s relevant as well.
Thank you! Filtering down to two conversations is not an option, because we want to have the big picture from many clients towards WAN breakout and do the MSA for them at 3 different points in the network.(Delay jitter loss). Goal is to proof that its not the LAN causing MS Teams problems.
Riverbed packet Analyzer plus is very helpful for that, but of course the pcaps should be as sync as possible.
Ok, i will split, find the 1st common packet of all pcaps, remove everything before, merge again, then analyze.
And in addition to that, is there a way to only keep the tcp streams which are seen in all 3 files and remove the remaining packets? So only keep common tcp streams? And for UDP too if possible?
Thank you