Wireshark GeoIP resolution setup
One of the many features Wireshark provides is the name resolution for various protocol layers, and I have to admit that – at least for me – some of them are really helpful while others (well, one of them, to be more specific) annoy the hell out of me. I really like MAC layer resolution, and often I enable network layer name resolution, but I really do not like protocol name resolution. Oh, and then there is GeoIP resolution, which is really helpful in some cases as well, but it takes a little time to set it up.
Update: There’s a newer article for GeoIP setup in Wireshark 2.x here.
Why GeoIP?
The idea behind GeoIP resolution is that you can see where an IP address is located and who the provider of that address is. It is very helpful in cases where you need to find out where packets are coming from or going to, and I had one case of a DDoS attack where GeoIP helped to tell that the source of the packets must have been spoofed since they seemingly arrived from all over the world: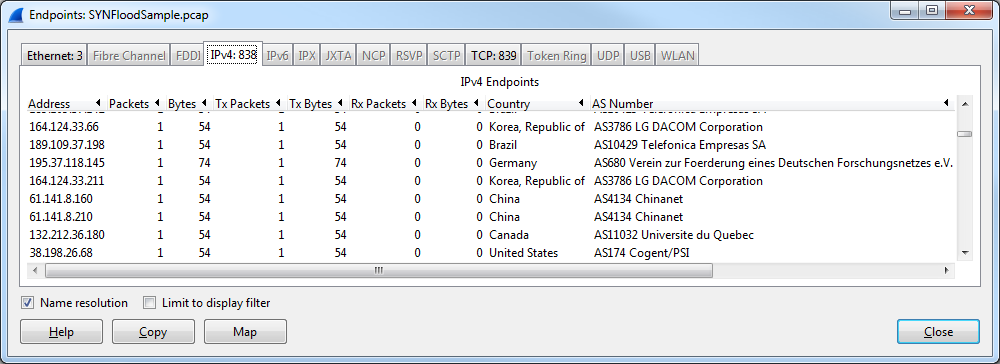
With the help of the “Map” button at the bottom you can open a web browser that will present a world map with the originating addresses on it, as shown in the following screen shot. It doesn’t look like much since it only contains addresses taken from a short sample trace, but with the original traces of that attack the whole map would more or less be covered in dots: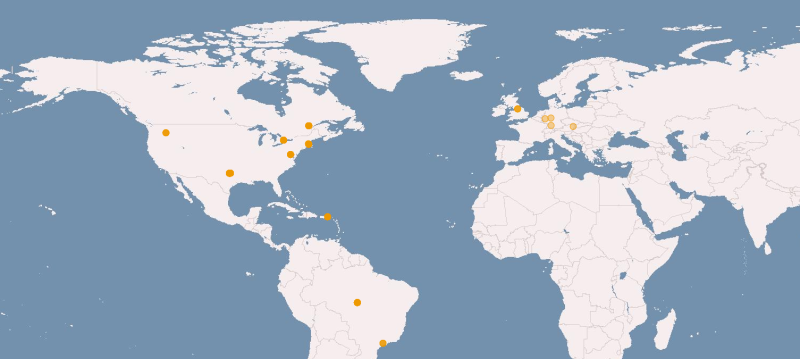
Enable GeoIP in Wireshark
GeoIP resolution requires you to download a couple of database files first. I usually use the ones available for free at MaxMind (the file format we need for Wireshark is now called “legacy”) They’re not as exact as the ones they provide for paying customers, but usually they should be good enough in most cases. Download the gzipped files for “country”, “city” and “ASN” and unpack them in a directory of your choice. If you run Windows and do not have a tool that knows how to unpack gzipped files you might want to take a look at 7Zip – it’s free, too. You should end up with 3 or 6 .dat files, depending on whether you only got the IPv4 databases or also downloaded the IPv6 files.
Now, we need to configure Wireshark to tell it to use these databases. Open up the preferences dialog, either through the “Edit” menu, or by pressing CTRL-ALT-P:
At the bottom of the right hand pane you see an “Edit” button with a caption next to it saying “GeoIP Database directories”. Click on it to open the next dialog:![]()
To add a new directory, press the “New” button. This will open a small new dialog box where you can select the path you unzipped the files into. In my experience this can get a little tricky because it doesn’t always get you where you want to go, so I usually select the “Other” option at the bottom to browse to the directory in a more comfortable way:
Yet another dialog will open, and if all else fails you might want to select the small editor icon on the upper left side to enter the path manually:
In the end, you should have something like this (my GeoIP database .dat files are in a directory called “D:\Library\GeoIP”:
If you want, you can check the Wireshark preferences for the IPv4 and IPv6 protocol to make sure that GeoIP lookups are activated, e.g. for IPv4:
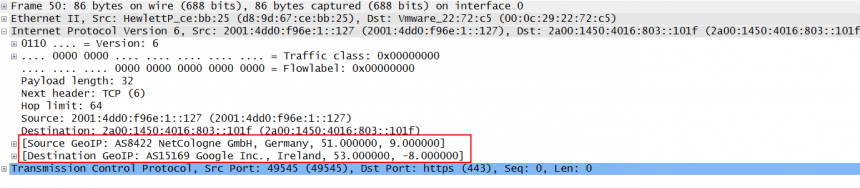
Finally, when you open a capture (or capture some new packets) you should see that the IP layers now show GeoIP information, like this:
It should also work in the endpoints statistics, e.g. for IPv4, which will show you the country, the AS number, City and coordinates, wherever possible:
That’s all for now, have fun tracking IP locations!
Discussions — One Response